Pages

Tuesday, January 31, 2017

A layout with the Bless Your Heart cut file set

Hello, it's Eunyoung here. Today I'll share a cute layout with a the Bless Your Heart cut file set.


 The Bless Your Heart cut file set includes adorable 4 heart designs. I chose small heart-shaped heart cut file. It is because I planed to use all of heart shapes (small and big one).


How to :
1. Cut the heart cut file and do machine stitching
2. Add the heart cut file on cardstock using pop-dots
3. Do machine stitching around heart cut file
4. Arrange a photo, banner ephemera and a title


5. Add a title with puffy alphabet
6. Add some heart pieces in heart-shaped space and background using pop-dots. 
7. Embellish with ephemera and puffy stickers
8. Finish to stamp a date 


 I hope you'll enjoy it and thank you for stopping by.


Monday, January 30, 2017

Happy Colorful You

Who needs some color for this winter day?  Wendy here today to share a colorful layout with you to drive away those winter blues.  One of the things I love about FL is how blue the sky is, and these papers from Pink Paislee with the fun cloud cut files make me think FL!


I love pulling from my cut file drawer, I create and then I go find the perfect little touches that add just the right finishing touch to my pages.  For this layout I used the Go Fly a Kite cut file and Spring Fling cut file.


Clouds are my favorite item (aside from doilies) to add into a page, as they build a scene and are usually light enough not to make the layout feel unbalanced.


I don't usually design scrapbook pages on a slant, but I loved fitting my items into the Pink Paislee paper, but to ground myself and not give me a conniption, I decided to use the flowers from the Spring Fling files to straighten my layout and to draw your eyes from the clouds in the sky to the flowers on the ground and build a scene for my pictures.


You can find these fun cut files and many more in the Cut Shoppe Etsy!


Sunday, January 29, 2017

Remember This

Hello friends! Enza here today to share a layout created with the Hello Hearts cut file. I wanted to scrap this sweet picture of my son on the day of his eighth birthday and decided to challenge myself by using colors I wouldn't normally use for a boy layout. Lots of pink on this page!


I started by cutting the hearts out of a multicolor patterned paper that came in the new February Clique Kits kit. I then backed the cut file with some clear vellum and used foam dots to stick it down. Since my son's picture matched the color of the paper on the right hand side of the cut file, I decided to go for a tone-on-tone look. 

Lots of layers were added to create more interest and draw attention to the picture.


I love how this layout turned out. The cut file paired perfectly with the beautiful patterned paper from the Hazelwood collection and allowed me to have fun with embellishments and colors.

I hope you felt inspired today. Don't forget to check out The Cut Shoppe Etsy store for some lovely cut files.

Thank you for stopping by! Have a great day!


Saturday, January 28, 2017

Rescued & Loved

Hello Cut Shoppe friends! Today I am sharing a sweet layout about Luna, a stray dog that we adopted last year.


For this project I used the Give a Dog a Bone and Bountiful Blessings cut files from The Cut Shoppe along with Paige Evans' Take Me Away collection from Pink Paislee.


My first step with this project was to create a background with the Give a Dog a Bone cut file. To do this, I duplicated the circles to create a row. With the row completed, I filled the page with the object and then welded all of the rows together to form one large file.


The background was cut using white card stock butI wanted to give it more color. I adhered the white card stock to a piece of patterned paper that looks like it was painted. Next, I used watercolors and painted the card stock to match the patterned paper.


Once the paint had dried, I began adding embellishments to the project. First, I backed my photo with patterned paper and adhered it to the page with foam squares. I used the Bountiful Blessings cut file to create a small cluster of hearts that I cut apart and placed in various places behind the photo. Next, I began layering die cuts and chipboard stickers on and around the picture along with a few more of the Bountiful Blessings hearts.


The title was next and it was also cut from the Give a Dog a Bone file. I used yellow paper from Take Me Away and backed it with white card stock. The was placed below the photo and embellishments with foam squares. The final touch was a pink suede bow just below the title.


Thank you for stopping by today! Be sure to visit The Cut Shoppe for these many other fantastic cut files!

Friday, January 27, 2017

Love Him!


Hello there!

Nathalie  with you today, to show you a new project that showcases two of the newly released cut files,  "Bless Your Heart" and "Cupid's Arrows"  in a sweet layout about the love my teenagers have for their 3 year old cousin!


 The background for this layout was created using the "Bless Your Heart" cut file.  The heart image was sized so that the center hearts were a little bigger than 1 in  in length.  In addition, an offset was added to the outer edge of the heart, so a little bit of stitching could be added.  The hearts inside the heart were cut from one of the Moonstruck collection papers included in Clique Kits's Wonderland kit.  Here are some close ups of the background:


For the title of this page, the "Cupid's Arrow" cut file was used to cute the love arrow than is mounted on top of the pictures.  To make sure the arrow popped on top of the black and white pictures, the image was cut out of patterned paper, and glued to an offset of the image cut in white card stock.      Here are some close ups:


The combination of these two cut files worked perfect to document these pictures,  I hope this serves as inspiration for your projects.  Don't forget to stop by the  Cut Shoppe store to check these cut files and more that are available at the store.  Remember to tag us "@thecutshoppe" and use the hashtag " #tcscutitout " to enter the monthly challenge.   We love to see what you create with the cut files.

Thanks for stopping by!


Thursday, January 26, 2017

Better Together

Hey there friends! Kelly back with a new layout using the Sweet Talker Cut File.


This particular cut file has more of a rectangular shape but I wanted it to fill an entire 12x12 background. I resized the cut file to 11.5 x 11.5 in Cricut Design Space, which is the largest size you can cut using the DS software. I love that the cut file still looks proportional even though I changed the dimensions from a rectangle to a square.


I cut the Sweet Talker Cut File on white cardstock and then backed the cut file on white cardstock. I love the look of white on white! It's subtle but adds so much texture! I ran a straight stitch through each line of the cut file image to help secure it to the background cardstock.


I then brought in my photo, mixed media, and layers which mainly consist of collections by Amy Tangerine. I also brought in a few buttons from the Pink Paislee-Paige Evans-Fancy Free Collection. This layout is so bright and cheerful just like my sweet pups!

Now you can take a look at my process video that shows the detail of how all of this came together.


Thanks for joining me today and remember to check out The Cut Shoppe for all of your cut file needs!


Wednesday, January 25, 2017

His Selfie Game is Strong

Hello it's Melissa here and I'm so happy to be back with you again!  If you have a son like mine  you're likely to have loads of selfies on your phone!  Sam (nearly 10) takes selfies every time he has my phone, and he leaves them as a surprise for me to find.

For this layout I used the And Then and Friends Forever cut file sets, and I used my December Hip Kit.  I choose the ampersand with stars, because I thought it really suited my son, and cut it large.  When I saw "Selfie" on the Forever Friends set I knew it was perfect for one of Sam's photos.


I went for a large title based around the "Selfie" cut file, and used a common slang phrase of today's day and age, which will be interesting to look back on in perpetuity.  I had to explain to Sam what it meant!


I love how the large ampersand looks cut from the Pink Paislee Take Me Away paper!


Here are the cut files:


There are so many other design possibilities for these cut file sets, which means more bang for your buck!

Thanks so much for looking


Tuesday, January 24, 2017

Carnival Fun

Hi friends! Mandy here with you today to share my newest layout that I created using cut files from The Cut Shoppe!


I've documented a couple of photos from when we took the kids to a local carnival recently. My parents joined us too, and we had so much fun going on some rides and eating ice cream cones!

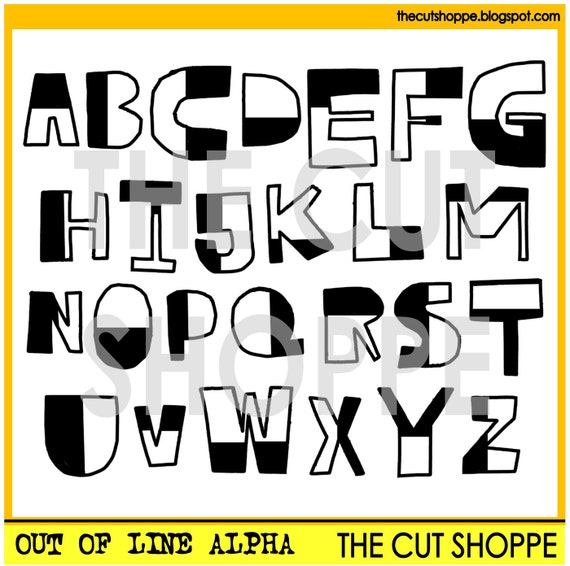
I wanted the layout to have a carefree and fun feel to it to match the photos, and the Out of Line Alpha cut file set was just perfect for this...

The Out of Line Alpha is an alphabet cut file set, that can be used on your scrapbooking and papercrafting projects.

I created the title for my layout using one of the patterned papers from the Paige Evans Take me Away collection and this cut file set. I backed the letters with a spotty patterned paper and  then added some foam tape underneath to give them some extra height and dimension. I completed my title with the word 'fun', which is a foam Thicker from the Take me Away collection.


Here you can see a closeup of how I embellished the top photo. How perfect is that chipboard horse for this layout?! The felt star that I layered underneath the horse is from Charms Creations, and the wood veneer scallop circle is another piece from the Take me Away collection.


The ice cream embellishment that I added to the right of the bottom photo is actually a sew on motif that I picked up from a kids clothing store recently. I'm always on the lookout for things that I can use on my layouts, and this worked perfectly on this page! I popped a flair button on top of the ice cream, and then tucked a colored wood veneer circle from the Take me Away collection underneath.


I finished the layout off by hand-writing my journaling straight onto the page, and then adding a sprinkling of star sequins.

Thanks so much for joining me on the blog today! Make sure you pop on over to the store to check out this super fun cut file!