Friday, August 23, 2019

I'm just Keira by Joanna

Hi friends, happy Friday! Joanna here sharing a sweet scrapbook layout of my daughter being her cute self. I used the newest Love Language cut file that was just released yesterday. When I saw this cut file I knew I had to use it right away with a little quote from my 2 year old.


 I used papers from the Dear Lizzy It's all Good collection to back the cut file. I staggered the photos and added some small clusters around them.

 I knew the title had to be "I'm just Keira" because that is what my daughter loves to say when we tell her she'd being silly or cute. 


Thanks for stopping by! Have a great day.


Thursday, August 22, 2019

NEW CUT FILES | Good Things

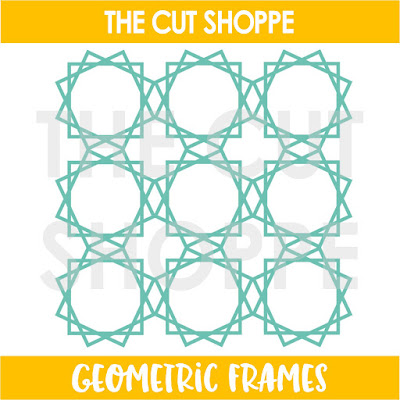
Even though it's probably just my imagination, it feels like fall is just around the corner.  But since it's still been in the mid 90's here, it's probably just wishful thinking.  My favorite thing about scrapbooking, is that it can be any season you want!  I broke out one of my new fall collections, Again and Again from Pink Paislee, to use with the NEW Geometric Frames Cut File.  And I have to tell you, that this layout makes me all kinds of happy!


https://thecutshoppe.com.co/collections/new-designs/products/geometric-frames


I went with a white cardstock background, so I could cut the Geometric Frames cut file from the wood grain patterned paper in the Again and Again collection.  I placed the cut file on my background paper and used liquid adhesive to adhere it.  Then I took the center of one of the frames, and used it as a template to cut the same shape from other papers in the collection.  I placed each shape inside the frames, and tried to vary the placement to keep similar patterns and colors from being side by side.


I cropped my photo into the same shape and used my paper trimmer to keep a white border around the photo.  I love the black & white photo on this layout, because the colors would have clashed, if I had left it in color.   I decided to keep the embellishing around the photo very simple.  I used a phrase sticker that says "smile" and an epoxy chevron piece.  The contrast of the black & white photo helps it to stand out, so I didn't really need a lot of embellishments around it to draw attention to it.


I always love to use stickers and ephemera from my collections, and the center of each of the geometric frames was a perfect spot for embellishing.  I used dimensional foam behind most of the embellishments to give them a bit of separation from the patterned paper beneath them.  

You can find the Geometric Frames cut file in The Cut Shoppe store, along with three other NEW Designs!!  Don't forget to stop by and check them out!

https://thecutshoppe.com.co/collections/new-designs

https://www.instagram.com/ashleyhorton75/

Wednesday, August 21, 2019

Teacher Gift with Kira

Well, it's that time of the year again.  Kids are heading back to school!  Or in the case of some, heading to school for the first time.  I have my very first kindergartner!  I can barely believe it!  Since I wanted to start this school year off right, I decided to create a little teacher appreciation gift for our first week of school.  I included some snacks, a bath bomb, a stamp set and this:


This is a super easy project to make, and requires very limited supplies.  I started with a Jillibean Soup rustic white frame.  I removed the white board from it and painted it black to give it the look of a chalkboard. 


Then I used my Cricut and some cut files from The Cut Shoppe to plan out my design.  I used the Write On Alpha for "Mrs. Pena".  I sized it to 7.5" wide so it would take up the majority of the frame's width. 


I used the pencil from the School Rules cut file below the teacher's name and sized it to about 7" wide.  I cut the cut files out from white vinyl and placed it on the black board. 


Then I replaced the frame and ta-da!  The perfect teacher's gift! 


Thanks for stopping by!


Monday, August 19, 2019

You Take A Little Piece | School Days Cut File With Theresa


Hello Lovelies! Theresa with you today for a back to school layout from way back when! I am using the School Days cut file which is just absolutely right now!


I am working with a bit of Pink Paislee today, the sweet and endearing Little Adventurer collection, plus a bit of Whimsical for the background paper.


I dug into the vault for this treasured photo from 2011 of Natalie on her first day of pre-school. Do you remember the days when our kids carried backpacks that were bigger than they were? Maybe your little darlings are just starting school - that is what this cut file reminded me of, so I cut the backpack from pink card stock as big as the 12x12 would allow.


As I laid my papers and photo on the table, I felt like the photo should go on top of the backpack, sort of like a clear pocket in the front and the photo showing through. Then I added the little embellishments around the photo and the giant unicorn like it is sticking out of the top of the pocket!


The cut file included a little name plate, so I added a little wooden embellishment to that as well.


I love connecting the title to the cut file by placing it around the cut, but this one is a bit different. I allowed the cut file to right-justify my title using those adorable alphabets from the collection. Notice how the journaling reinforces the title: "I wonder, do you know, you have my heart in that giant backpack?" 


I also added a few wooden clouds, the moon, the die cut balloon, and a few tiny stars around the title as well. 


 Such a wonderful way to tell this precious story! I will just be over in the corner wondering how the years went so fast, and yet so incredibly grateful to have this memory in our albums. Thank you for joining me today! I hope you will hop over to the shop and grab the School Days cut file if you don't have it already, and then be sure to share with us how you use it! We would love to see!


Sunday, August 18, 2019

too cool for school | iris fox


Hello fellow cut file fans!  Iris here with a back-to-school layout using not one, but two recent cut files: School Days and Too Cool for School.


It's not easy to find school products that compliment the purple both my daughter and her boyfriend are wearing in the photos, but I happened to have this multi-colored lined paper from Shimelle's Sparkle City.  It was kismet.  I left the branding strip to ground the page and cut off from the top to make it 12x12.

My idea was to create a doodley background, having the two cut files cut in black to be part of the doodles, so I cut both from black cardstock. Too Cool for School is cut 6 inches high and the backpack is 3 inches high.


I strategically placed the backpack diagonally from the title, and a speech bubble-shaped clip at the top, giving me a visual triangle of deep black outlined elements. Then I gathered lots of fun embellishments that would go with teens at school and complemented the colors, from a variety of manufacturers. I scattered them them along the diagonal starting from the bottom left going up to the top right.  

I nestled my journaling under the photos between a cluster of embellishments and the title.  I then stamped some doodles and phrases from Crafty Jen Schow's Here for It stamp to fill in spaces between embellishments and to add a little bit of layering.  The date fit snuggly within the speech bubble.  The final touch was to sprinkle purple acrylic paint.


With back-to-school season in full swing, you'll want to stop by The Cut Shoppe to grab some fabulous back-to-school cut files!


Saturday, August 17, 2019

be the light | orange gearle

Hello!  Orange Gearle here with one file -- but two projects!  Today I am using the Be The Light cut file for two off-the-page projects. Here are my projects!


Here is the Be The Light file?


The word I chose as my "word" this year is Light!  When I saw this cut file I wanted to plaster it on everything!  I settled for two things (so far). I used vinyl to make myself a skin for my computer. I cut out the center of the lightbulb in yellow for extra pop!

I also made a t-shirt that I will wear proudly!!!

Thanks so much for stopping by. I hope I have inspired you to look at using cut files not just for paper projects -- but also to take it off the page! XO o.g.


Friday, August 16, 2019

"Adventure" with Kira

Hey there!  It's Kira and I am back with another 8.5x11 scrapbook layout using a cut file from The Cut Shoppe.  Here's a look at my layout:


I started with a photo of my youngest son on one of our daily adventures around the duck pond.  We go so often that he got into the routine of going a certain way every time.  So when I was choosing my cut file, I decided to go with Going My Way


I cut it on white cardstock and then adhered it to a pale pink ombre background.  I positioned it slightly off center, just to add some more visual interest. 


I positioned my photo towards the lower half of my layout, and then built an embellishment cluster to the left of it. 


I added my title on top of the cluster and added some feathers below it, since we were looking at the ducks in the photo. 


I added a second embellishment cluster in the top right.  I finished off the entire layout with some black splatters. 


Thanks for stopping by!