Showing posts with label foil. Show all posts

Sunday, December 17, 2017

Party on | Anna Komenda

Hello everyone. It's Anna here with my last project for 2017. I can't believe how fast this year went by. I am wrapping up this year with a party themed page. My daughter turned 9 few days ago and we had a party at home. Every year we buy giant balloon with a number and fill it with helium. It's like a tradition. Each year I take pictures of her with that balloon and scrap them like crazy :)


This year we had a pink 9 and when I was scrolling through the Cut Shoppe site I found this fun set of birthday cut files called "Party on"
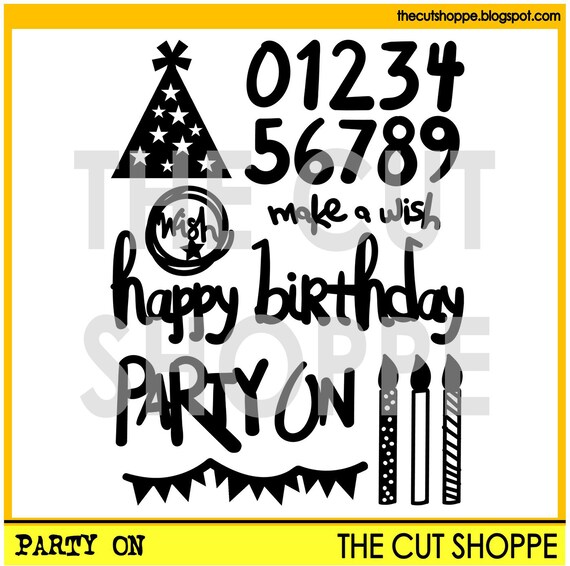

I thought that those numbers look the same as our balloon and it started the process of inspiration and planning the page.


I wanted to add shimmer so I printed the "9" and "party on" using my laser printer and foiled it with Minc. You can use Print and cut feature or just cut it by hand. Just remember to leave a little offset. Thank to that the foil will cover the edges nicely too. 


I used rose gold foil for the "9" and gold for "party on". i also cut party hat and 9 candles using watercolor paper. I painted them with watercolors ans added to tge design.


Taking pictures of foiled elements is a nightmare. No matter how hard you try - you can't show how pretty the foiling is. It looks like a black surface. Foiling is a fun way of using your cut files and I like doing it from time to time. There is a magic happening when you peel of the foil and reveal the foiled image.

I hope you like my page. Thank you for stopping by and see you in 2018. Have a very merry Christmas and a Happy New Year.

Anna


Monday, March 13, 2017

Always be a Unicorn

Hello Cut Shoppe Friends! Today I want to share a layout I created using the A Walk in the Clouds, Quick Quotes, and Unicorn Xing cut files. This project has a lot of subtle detail in the background and the title pops with rainbow-colored foil.


Since I knew the title was going to very colorful, I decided to use white cardstock for the base as well as the cloud background.


To create the title, I used the Quick Quotes cut file with Heidi Swapp toner paper. In addition to the title, I also cut stars from the Unicorn Xing file. Once everything was cut, I applied Thermoweb Deco Foil with my Minc to each of the pieces.


All of this was layered on top of the A Walk in the Clouds cut file, which was sized to fit the 12x12 piece of white cardstock.


The photo is matted on a white glassine bag that I've been hanging onto. I used a small piece left over from the bag to type "Halloween 2005" with my WRMK typewriter, which I adhered to the picture. I followed that with the negative cuts from the clouds, which I adhered with foam squares. Last, I placed a few of the stars above and below the photo to balance the color on the layout.


Thank you for stopping by today and I hope you are inspired to create! Please visit The Cut Shoppe for these and many other fantastic files, and visit us on Instagram for daily inspiration.


Friday, January 29, 2016

Bob the Betta with Retro Rectangles

Hey there Cut Shoppe fans!  It's Katrina from Paper, Scissors and Glue here today to share a fun new way to use your cut files.  If you have a laminator and a laser printer you are already there!  If not, you are going to want to get them.


 I used the Retro Rectangles file for my background, but as you can see, it's not cut!  That is because I foiled it.  Yep, you read that right, foiled!  Foiling is the new hot trend right now and there are several different ways to do it. I am here to show you how use a laser printer to create a background.


I picked out the file I wanted to use and then a pattern paper that I wanted to be my background.  Because my laser printer only prints letter size, I cut my pattern paper down to 8.5 x 11 so I could run it thru the printer.  Open up a Word on your computer and then insert a picture. You could also use any program that you could do this in. This will be where you insert your cut file onto your document. Size it to however big you want it and adjust where you want it on your page.  Then just print it out with your laser printer. This is what it looks like below.


It has to be a laser printer, not an inkjet.  An inkjet printer will not work, because the foil reacts with the toner from the laser printer when heat is applied aka running thru a laminator. Just lay the foil transfer sheet, color side up, onto your pattern paper. Use a carrier sheet to run it thru the laminator.  I had to make two passes, because my foil sheets were only 6x12 inches. OH and I use parchment paper as a carrier sheet!  


Once you have foiled all the areas, you peel back the foil and the magic happens.  This is the fun part!  If parts don't cover well, you can always run everything back thru the laminator again to cover the parts that were missed.  It doesn't hurt the foil that is already applied.


Here you can see the shine.  This is so fun to do and it's another fun use for your cut files.  I know I am going to be doing it more!


And these are pictures of Bob my betta fish.  I wanted to get a fish for my office at work, but I ended up getting attached to him at home and couldn't take him to work!  He is quite social and is one of the prettiest bettas I have seen!


If you have any questions about foiling cut files, please feel free to contact me and I will help if I can.  I can tell you that I used a Canon w6030 laser printer, a Royal Sovereign laminator that will laminate up to 12 inches and DecoFoil for my foil.  You can pick up the laser printer and laminator at pretty good prices if you watch for sales online.  I got the printer for under 70.00.  

Thanks for stopping by the blog today! And don't forget to head to the shop to pick up some fun cut files to use!