Tuesday, July 31, 2018

Wild & Free by Jill

Oh my goodness, I love scrapping summer pics of my girly... this is my second summer photo layout for July, this one features the new Rough Waters 8.5x11 file from The Cut Shoppe Etsy store.

I enlarged the 8.5x11 file just a bit, then adhered it to my layout background.  The photo shows my Q playing in the sprinkler, and I wanted a fun water-outside-whimsical feel to my page, so I fussy cut some clouds from a patterned paper and added a few with foam adhesive.


The photo is layered on several photo frames, then I placed another on top of the photo to frame my cute girl.  I layered another cloud over the photo, then added a chipboard title.

I added some sentiment stickers around the title, then created another little cluster towards the bottom of the page with stickers and die cuts.


There are a few silver thread tangles, but they didn't show up so great in the photos.  I wanted a bit more whimsy and texture on the page, and thread "nests" are a perfect addition.


How's your summer scrapping coming along?  Don't worry if you're behind, this photo is from last summer, haha! 


Monday, July 30, 2018

Guest Designer | Samantha Klaebe

We love seeing how all of you are using the Cut Files from The Cut Shoppe!  And when you share on social media and tag us, sometimes it can even earn you a Guest Designer spot!  Today, Samantha Klaebe is joining us as our July Guest Designer.  Sam submitted to our last DT call inquiring about a guest spot, and we loved her cards so much, we just had to have her share on the Blog!  Before we take a look at Sam's cards, let's get to know a little bit more about her.


Hello I’m Samantha. I’m from South Australia, Australia. Any spare time I have, you’ll find me in my craft room creating cards! I’ve always been a creative person – so I find real joy in making cards not necessarily for anyone but because it allows me to express myself creatively and even emotionally. It’s very relaxing at the end of a crazy day to just sit down (in the quiet) and concentrate on nothing else but colour combos and stamp placement. If I’m not in my craft room then you‘d find me chasing after my young family of three.

I enjoyed using Ashley’s cut files and creating these cards this month. Thank you for having me and I hope you enjoyed my cards too.


Now let's take a look at Sam's cards!  First up, is a fun pineapple card, using the Summer Vibes cut file. 


Sam's second card features the Flutterby cut file, and we love the way she altered it from it's larger size, to make it work for her card.


How awesome are both of her designs??!!  It just goes to show, that our cut files can be used for all of your craft related projects!

Thanks so much for joining us this month, Samantha!  You can follow Sam's Blog and find more of her inspiring work by visiting My Little Paper World

Sunday, July 29, 2018

Summer Sun & Fun | Donna Espiritu

Hello TCS friends! Donna here and today I'm going to share a fun summer layout using the Rough Waters cut file.


I used just half instead of the whole 12x12 cut file. I cut it with my Silhouette Cameo machine using a bluish patterned paper to mimic waves. I also backed some of the spaces with a patterned paper with darker or contrasting color then mounted with foam tape.

The flamingo and "sun & fun" part of the title were from the Free Printable you can download from the TCS SCrap Spot Facebook Group.
The colors in the Clique Kits "Horizon" kit and the free printables are perfect together.

I splattered some teal, yellow and coral paint mists to add texture and mounted most of the embellishments with foam tape for a bit of dimension.


I hope my project inspired you to create something today.
Thanks for dropping by and happy crafting!


Saturday, July 28, 2018

So Lucky TN Spread with Neftali

Happy Saturday scrappy friends! It’s Neftali here with you today to share some scrappy inspiration. Today I have a super duper quick Travelers Notebook spread using the Beach Bum cutfile set below using gelatos and a fun trick to mix them into your Travelers notebooks!


I only used the sea shell cutfile out of the Beach Bum set for this project. 

Before I continue, let me show you the finished spread:


It’s a super simple spread that I decided to create to keep the main focus on this stunning photo of the sunset here in California. I also chose my colors from the photo and kept it to a monochromatic gold. 
So for my background I brought out some more Gellatos in a copper, gold, and peach color. 

I didn’t use water at all, instead, I used my fingers to rub out the color. It works wonders, too. The warmth of your fingers helps rub out the creamy crayons, and since were working on such thin pages from the TN notebook, this is a perfect technique to add a bit of color on your backgrounds.


I also used the gelatos to color over the cutfile and it just gives it the perfect pop off the page and the colors of the background.


Not only did I use the gold color schemes gellatos but I also added some gold shimmer spray. Then I was ready to add my photo. I just cut that to add to both sides of the spread, instead of folding it, and I finished it off with some gorgeous gold glitter Thickers with the phrase, “So Lucky.” Because seriously, there’s no other feeling you get standing at the foot of this glorious sight. 


So, lovelies, this was pretty much all I did to create this TN spread. It came together very quickly, and I am actually currently loving popping into my TN or other projects to create simple projects that include new and fun techniques. I hope I have inspired you all to grab this cut file and give it a go for those summer photos you might have.

Thanks for stopping by today! 


Friday, July 27, 2018

I Could Cuddle You Forever | Tarrah McLean

Hi Cut Shoppe friends!

It's Tarrah McLean back with you and today I am sharing a new layout created using the awesome Basket Weave background cut file


I cut the basket weave cut file from a pretty ombre pink and yellow paper by Paige Evans. Once it was all cut out, I pulled up the thin outline to reveal all the small inner pieces on the mat. 

I lightly adhered the thin outline piece with some washi tape to some white cardstock and then began to adhere all the pieces back into the cut file like a jigsaw puzzle. Once they were all back in place and glued down, I pulled up the outline again. I love it turned out!

I kept the embellishing fairly simple for this page so not to cover up too much of the background cut file effect. I mostly added some embellishments to highlight my photo by placing them framing my photo.

I think this is such an awesome effect especially with the ombre paper! Why don't you give it a try? We would love to see what you create using a similar technique! Share with us in our Facebook group called The Cut Shoppe Scrap Spot!

Thanks for stopping today!

Happy creating!
 

Thursday, July 26, 2018

New Cut Files | Pool Boy

Are you ready for some awesome new Cut Files!  We've got some great designs in the shop today!  Most of the time, I like to work with one cut file or set, when I'm doing a layout for the reveal day, but for today's layout I combined two sets!  I worked with Rough Waters and Vacay Mode.  It's fun to layer smaller cut files over a background cut file, and that's just what I did on this layout!


https://www.etsy.com/listing/631468821/the-rough-waters-cut-file-can-be-used?ref=shop_home_feat_3

https://www.etsy.com/listing/631469265/the-vacay-mode-cut-file-can-be-used-for?ref=shop_home_feat_4


I used the Crate Paper Oasis collection for this layout, but chose my background paper from the Chasing Dreams collection.  I wanted a patterned paper for the background, but I wanted it to be subtle, since I was planning to layer the Rough Waters cut file over it.  I cut the 12x12 Rough Waters design from a teal paper in the Oasis collection, and then adhered it in a few spots with some liquid adhesive to my background paper.  Then I machine stitched along a few of the wave lines to make sure the cut file was secure on my layout.


I also wanted to incorporate the Vacay Mode cut file on this layout, so I thought it would be fun to use the swim trunks to go with the photo of our son at the pool.  I would say about 85% of scrapbook products lean more toward a feminine look, so it's always good to have embellishments that work for masculine pages too.  I cut the swim trunk design from three different papers from the 6x6 paper pad.  Then I embellished each one just a little bit differently, and placed them in a clothesline design on the layout.


Once I had the swim trunks in place, I machine stitched along the top of each one, to reinforce the clothesline effect.  Then I used a mix of Thickers from the Here & There collection and the Oasis collection for my title.  I usually love layering my title over White space in my photos, and the large Thickers worked great over this photo.  To finish the layout, I added a few more embellishments to create a visual triangle.

Make sure you head over to The Cut Shoppe Etsy store today, and see all of the new cut files!  Our designs are perfect for any project, that you're planning to create!!

https://www.etsy.com/shop/TheCutShoppe

https://www.instagram.com/ashleyhorton75/
 

Wednesday, July 25, 2018

Making Cards With The Cut Shoppe Printable Files

Hello everyone... Helen is here. Today I have couple cards to share with you all that I created using The Cut Shoppe Printable Files. They are super fun to use on any kind of projects!

On my cards today, I used the Road Trip Printable that is available at The Cut Shoppe Store and the Summer Sizzle Printable that is for you to download it for free at The Cut Shoppe Scrap Spot Facebook Group. If you have not yet joined the group, you would want to... there are many inspirations from the team and members, too.


I print the Road Trip Printable and Summer Sizzle Printable on white cardstock with inkjet printer. And then I cut them with my Silhouette Cameo.


My first card is a clean-and-simple card, very easy to make. I added some natural twine ribbon on the tag. Then I stacked the tag, feather and hello word on the card using adhesive glue. I added the heart in the middle of the letter O.


On the second card, I made bridge fold card. I found this easy-to-follow tutorial that I used to create the folded card base. I added the patterned paper on the card after I scored and folded each of the section.

I added the white cardstock strip as the bridge on the card using adhesive glue, then I added the cactus cut outs on each side with adhesive glue. I added the word hello on the bridge with 3D foam tape for extra dimension.

Making these cards with these printable sets is fun and quick. I hope you all can enjoy and inspired to create projects with The Cut Shoppe cutting files and printable files.


Available at The Cut Shoppe Store

Available for free at The Cut Shoppe Scrap Spot FB Group

Thank you so much for stopping by today... Have a fabulous day!


Tuesday, July 24, 2018

Summer Pool Fun | Kelly Janes

Hey there friends! Kelly here today to share a new layout using the FREE Cool in the Pool Cut File.


I enlarged the cut file in Cricut Design Space and cut it on textured white cardstock. I then used a brayer to paint light blue acrylic paint on the white cardstock before removing the cut file from my cutting mat. Next I backed the cut file with different summer themed patterned papers. I added fun embellishments around the page..tucking them behind and layering them on top of the cut file.


This cut file is so fun and perfect for documenting your summer memories! Don't forget to visit The Cut Shoppe Etsy Store to check out all of the other fun summer cut files!


Monday, July 23, 2018

Christmas in July with Kira

Hey everyone!  I can't help myself when I see a fun trend going on in the crafty world...I just HAVE to join in.  So when everyone started posting about their fun Christmas in July projects, I was feeling a bit left out.  Since I usually complete my entire holiday album in December, I don't have a lot of Christmas photos to scrap in July, but I thought I could make some cute Christmas decor instead!


Have you used The Cut Shoppe cut files for home decor yet?!  If not, I am going to show you step by step how easy it can be!

First, gather your supplies:
 - project surface (I used this 18" x 5" wood plaque)
 - paint and paint brushes (I stuck with white and black but clearly you could make this project as colorful as you'd like!)
 - vinyl (I am no vinyl expert and know there are tons of choices out there, I used American Crafts black mat vinyl which I purchased at my local Tuesday Morning)
 - a cut file or two!
 - a die cut machine (I own/use a Cricut, but I know Silhouette has all the same capabilities in this department)
 - contact paper or blue painters tape


I started by painting my wood plaque.  I used regular acrylic paint and painted the background white and the "frame" black.  It's best to do this first so you can let it dry while you cut your vinyl.

Next, choose your design.  I used the Wintry Mix cut file as my main focus on this piece.  I had a hard time deciding between a few of the designs on this cut file because they're all so cute!  I eventually went with the mountains.  I sized them to 4" tall so they would fit on my plaque.  This only made them about 8" wide though, and needed to fill in some space.  So I used the Brush Up Alpha to spell out the phrase "Let it Snow". 


Once I had the sizing how I wanted it, I cut everything out on the vinyl.  You'll place your vinyl color side up on your mat to cut, and choose the appropriate setting on your machine. 


 Once the images are cut out, you'll need to "weed" the image, leaving it looking like this:

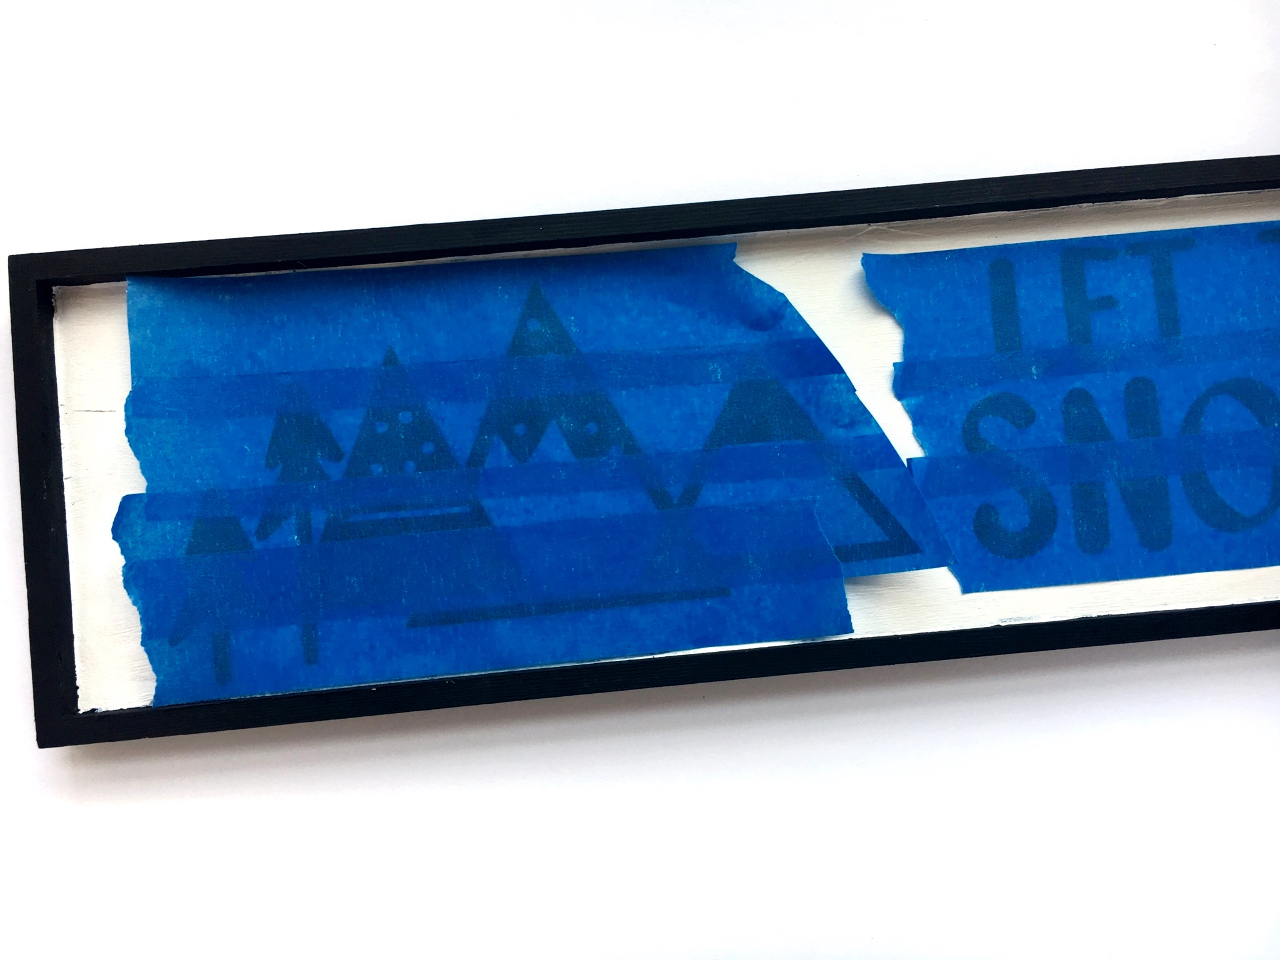
Then you'll use contact paper, or blue painters tape (whichever you have on hand, they both work great!) to transfer the images to your project base. 


If you use painters tape, layer each strip over the other so it forms a single sheet of tape.  Rub over the top of the tape so that the vinyl adheres to the tape and lift it from the vinyl backing. Then place the image on your project base. 

Once all the images are where you like them, rub down so that everything sticks in place.  When removing the tape, go slowly so you don't accidentally ruin placement or tear the vinyl.

 And there you go!  A custom piece of Christmas decor!


I had made a mistake on my first cut so I had an extra little tree from the Wintry Mix cut file.  I decided to place it to the right of "Let it Snow". 


I am super happy with how this came out and can't wait to display this with the rest of my holiday decor this winter!  Thanks for stopping by!

xo, Kira