Well, it's that time of the year again. Kids are heading back to school! Or in the case of some, heading to school for the first time. I have my very first kindergartner! I can barely believe it! Since I wanted to start this school year off right, I decided to create a little teacher appreciation gift for our first week of school. I included some snacks, a bath bomb, a stamp set and this:
This is a super easy project to make, and requires very limited supplies. I started with a Jillibean Soup rustic white frame. I removed the white board from it and painted it black to give it the look of a chalkboard.
Then I used my Cricut and some cut files from The Cut Shoppe to plan out my design. I used the Write On Alpha for "Mrs. Pena". I sized it to 7.5" wide so it would take up the majority of the frame's width.
I used the pencil from the School Rules cut file below the teacher's name and sized it to about 7" wide. I cut the cut files out from white vinyl and placed it on the black board.
Then I replaced the frame and ta-da! The perfect teacher's gift!
Thanks for stopping by!
Showing posts with label DIY crafts. Show all posts
Wednesday, August 21, 2019
Monday, July 23, 2018
Christmas in July with Kira
Hey everyone! I can't help myself when I see a fun trend going on in the crafty world...I just HAVE to join in. So when everyone started posting about their fun Christmas in July projects, I was feeling a bit left out. Since I usually complete my entire holiday album in December, I don't have a lot of Christmas photos to scrap in July, but I thought I could make some cute Christmas decor instead!
Have you used The Cut Shoppe cut files for home decor yet?! If not, I am going to show you step by step how easy it can be!
First, gather your supplies:
- project surface (I used this 18" x 5" wood plaque)
- paint and paint brushes (I stuck with white and black but clearly you could make this project as colorful as you'd like!)
- vinyl (I am no vinyl expert and know there are tons of choices out there, I used American Crafts black mat vinyl which I purchased at my local Tuesday Morning)
- a cut file or two!
- a die cut machine (I own/use a Cricut, but I know Silhouette has all the same capabilities in this department)
- contact paper or blue painters tape
I started by painting my wood plaque. I used regular acrylic paint and painted the background white and the "frame" black. It's best to do this first so you can let it dry while you cut your vinyl.
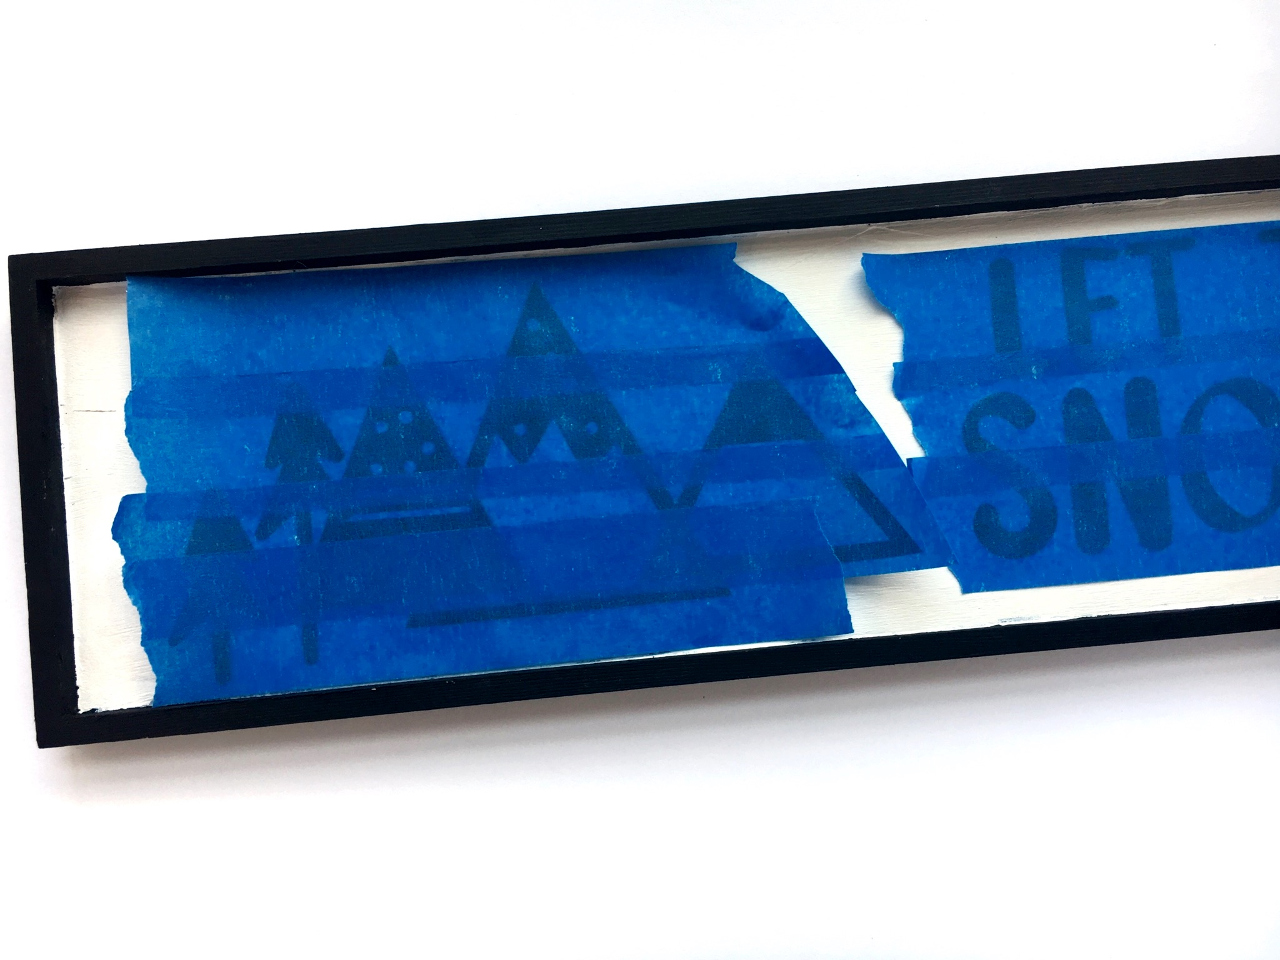
Next, choose your design. I used the Wintry Mix cut file as my main focus on this piece. I had a hard time deciding between a few of the designs on this cut file because they're all so cute! I eventually went with the mountains. I sized them to 4" tall so they would fit on my plaque. This only made them about 8" wide though, and needed to fill in some space. So I used the Brush Up Alpha to spell out the phrase "Let it Snow".
Once I had the sizing how I wanted it, I cut everything out on the vinyl. You'll place your vinyl color side up on your mat to cut, and choose the appropriate setting on your machine.
Once the images are cut out, you'll need to "weed" the image, leaving it looking like this:
Then you'll use contact paper, or blue painters tape (whichever you have on hand, they both work great!) to transfer the images to your project base.
If you use painters tape, layer each strip over the other so it forms a single sheet of tape. Rub over the top of the tape so that the vinyl adheres to the tape and lift it from the vinyl backing. Then place the image on your project base.
Once all the images are where you like them, rub down so that everything sticks in place. When removing the tape, go slowly so you don't accidentally ruin placement or tear the vinyl.
And there you go! A custom piece of Christmas decor!
I had made a mistake on my first cut so I had an extra little tree from the Wintry Mix cut file. I decided to place it to the right of "Let it Snow".
I am super happy with how this came out and can't wait to display this with the rest of my holiday decor this winter! Thanks for stopping by!
xo, Kira
Have you used The Cut Shoppe cut files for home decor yet?! If not, I am going to show you step by step how easy it can be!
First, gather your supplies:
- project surface (I used this 18" x 5" wood plaque)
- paint and paint brushes (I stuck with white and black but clearly you could make this project as colorful as you'd like!)
- vinyl (I am no vinyl expert and know there are tons of choices out there, I used American Crafts black mat vinyl which I purchased at my local Tuesday Morning)
- a cut file or two!
- a die cut machine (I own/use a Cricut, but I know Silhouette has all the same capabilities in this department)
- contact paper or blue painters tape
I started by painting my wood plaque. I used regular acrylic paint and painted the background white and the "frame" black. It's best to do this first so you can let it dry while you cut your vinyl.
Next, choose your design. I used the Wintry Mix cut file as my main focus on this piece. I had a hard time deciding between a few of the designs on this cut file because they're all so cute! I eventually went with the mountains. I sized them to 4" tall so they would fit on my plaque. This only made them about 8" wide though, and needed to fill in some space. So I used the Brush Up Alpha to spell out the phrase "Let it Snow".
Once I had the sizing how I wanted it, I cut everything out on the vinyl. You'll place your vinyl color side up on your mat to cut, and choose the appropriate setting on your machine.
Once the images are cut out, you'll need to "weed" the image, leaving it looking like this:
Then you'll use contact paper, or blue painters tape (whichever you have on hand, they both work great!) to transfer the images to your project base.
If you use painters tape, layer each strip over the other so it forms a single sheet of tape. Rub over the top of the tape so that the vinyl adheres to the tape and lift it from the vinyl backing. Then place the image on your project base.
Once all the images are where you like them, rub down so that everything sticks in place. When removing the tape, go slowly so you don't accidentally ruin placement or tear the vinyl.
And there you go! A custom piece of Christmas decor!
I had made a mistake on my first cut so I had an extra little tree from the Wintry Mix cut file. I decided to place it to the right of "Let it Snow".
I am super happy with how this came out and can't wait to display this with the rest of my holiday decor this winter! Thanks for stopping by!
xo, Kira
Wednesday, July 11, 2018
DIY Personalized T-Shirt and Coffee Mug | Helen Gullett
Hello The Cut Shoppe friends... Helen is back here today with another fun DIY projects using The Cut Shoppe Cutting Files.
Personalizing items are fun, special, and perfect for gifts and even for yourself to use. And... thankful for digital cutting files, you can create any thing and any style with them.
My projects today are a Personalized T-Shirt and Personalized Coffee Mug using the Brush Up Alpha, the Bountiful Blessings, and the Java Scripts.
On the t-shirt, I created the words, Grateful and Caffeinated, using the Brush Up Alpha set. First, I opened the files in PNG using my Silhouette Studio Designer Software. Then I traced them to make the cutting lines. I released the compound path for all of them, and then picked the letters I wanted to use for the words, then create compound path again.
Next step is I arranged them slightly overlapping each other, and then weld.
For the Blessed arrow word, I simply opened the PNG file, then traced the image, then released compound path of all, and then created the compound path just for the Blessed arrow word.
I measured the width and length the space I wanted to put the cut out vinyl on the t-shirt. I arranged all the all the words, resized, grouped, and then resized again to fit the size on the shirt.
Alway to remember that when you work with Heat Transfer Vinyl (HTV), ALWAYS REVERSE your image before cutting it. I cut it out using the black glitter heat transfer vinyl, I added a pillow case on top of the shirt, and then using my iron (hottest setting, no steam) to transfer the image on my shirt. I pressed the top and I pressed again from the back. It is about 20-30 seconds each press.
And for the mug... to create the cutting files, I followed the same step I did for the Blessed arrow word. I resized the image to fit on my coffee mug.
I cut the image out using the purple glitter HTV. Before adding the cut out HTV on the mug, make sure you clean the mug with alcohol wipe to remove all the residue and dirt.
I added the cut out HTV on the mug, and I used my iron to transfer the image. I did it directly on top of the plastic carrier, no pillow case layer. I pressed longer that I did on the shirt. And also I only used the tip of the iron. I lifted up the plastic carried often to make sure the HTV was glued on the mug.
After all image transferred well on the mug, I secured it with Mod Podge Dishwasher Safe. Using this Mod Podge, to make sure it can be washed at Top Rack Dishwasher. But it takes about 30 days to cure before you can put it in the dishwasher. So if you plan to make this mug for presents, plan ahead... especially for Christmas, it is great time to start planning and making :D :D :D
Here are all the cutting files I used on my projects today:
I hope these projects give you some inspirations to keep creating with The Cut Shoppe cutting files. THANK YOU so much for stopping by today. Have wonderful day!
Personalizing items are fun, special, and perfect for gifts and even for yourself to use. And... thankful for digital cutting files, you can create any thing and any style with them.
My projects today are a Personalized T-Shirt and Personalized Coffee Mug using the Brush Up Alpha, the Bountiful Blessings, and the Java Scripts.
On the t-shirt, I created the words, Grateful and Caffeinated, using the Brush Up Alpha set. First, I opened the files in PNG using my Silhouette Studio Designer Software. Then I traced them to make the cutting lines. I released the compound path for all of them, and then picked the letters I wanted to use for the words, then create compound path again.
Next step is I arranged them slightly overlapping each other, and then weld.
For the Blessed arrow word, I simply opened the PNG file, then traced the image, then released compound path of all, and then created the compound path just for the Blessed arrow word.
I measured the width and length the space I wanted to put the cut out vinyl on the t-shirt. I arranged all the all the words, resized, grouped, and then resized again to fit the size on the shirt.
Alway to remember that when you work with Heat Transfer Vinyl (HTV), ALWAYS REVERSE your image before cutting it. I cut it out using the black glitter heat transfer vinyl, I added a pillow case on top of the shirt, and then using my iron (hottest setting, no steam) to transfer the image on my shirt. I pressed the top and I pressed again from the back. It is about 20-30 seconds each press.
And for the mug... to create the cutting files, I followed the same step I did for the Blessed arrow word. I resized the image to fit on my coffee mug.
I cut the image out using the purple glitter HTV. Before adding the cut out HTV on the mug, make sure you clean the mug with alcohol wipe to remove all the residue and dirt.
I added the cut out HTV on the mug, and I used my iron to transfer the image. I did it directly on top of the plastic carrier, no pillow case layer. I pressed longer that I did on the shirt. And also I only used the tip of the iron. I lifted up the plastic carried often to make sure the HTV was glued on the mug.
After all image transferred well on the mug, I secured it with Mod Podge Dishwasher Safe. Using this Mod Podge, to make sure it can be washed at Top Rack Dishwasher. But it takes about 30 days to cure before you can put it in the dishwasher. So if you plan to make this mug for presents, plan ahead... especially for Christmas, it is great time to start planning and making :D :D :D
Here are all the cutting files I used on my projects today:
Monday, May 21, 2018
DIY Canvas Tote Bags For Teachers | Helen Gullett
Hello The Cut Shoppe fans! Helen is here today... School year reaches the end and we are so totally all the teachers for all what they have done to help our children to grow. For them, I made these canvas tote bags that filled with gifts.
I put the cut out HTV images on the canvas (plastic carrier on top), added pillow case on it, and then I ironed it with the highest/cotton setting and no steam. I pressed it down for at leas 20-30 seconds each section. Once a while I checked it if it sticked or not yet.
I dressed up these three canvas tote bags with glitter heat transfer vinyls (HTV) that I cut them with cutting files from The Cut Shoppe.
On this first canvas tote bag, I cut out the some of the images from the School Rules and You've Been Schooled. When you work with HTV and vinyl, don't forget to mirror the images, and then cut. After I cut and weeded them, I saved the numbers and letters for the second canvas tote bag.
On the third canvas tote bag, I used the All Caps Alpha cutting filed to create the words: Teach and Inspire. With alpha cutting files, you can create any word you want to put on your project!
For the love heart image, I welded the heart image from Friends Forever and the word "love" from Words To Live By cutting files. Before I welded them together, first I removed the word "life" from the "Love Life!" using the erase tool on Silhouette Studio.
After I arranged them in the space where I wanted them to be, I mirrored them, and then cut. Then, I ironed them just like the first 2 tote bags above.
Creating these canvas tote bags is super fun. I love the options what I can do with digital cutting files on projects I want to create.
I hope today's projects give you some inspiration to try something new with The Cut Shoppe cutting files! Thank you so very much for stopping by today. Have a fabulous day!
Friday, January 23, 2015
Pineapple Art Print
Hi everyone,
I hope your Friday is off to a great start! Gina here, and I am excited to share a new project with you using the Prickly Pineapple cut file.
To create my art print I cut out the Prickly Pineapples cut file using my Silhouette Cameo. Then I used it as a mask. I painted over it with watercolor paints onto watercolor paper using a water brush. Once it was dry I framed it. This simple art print will make a sweet addition to any room.
Supplies: Prickly Pineapples Cut File: The Cut Shoppe; Other: watercolors, watercolor paper
Subscribe to:
Posts (Atom)