Showing posts with label Bountiful Blessings. Show all posts

Wednesday, July 11, 2018

DIY Personalized T-Shirt and Coffee Mug | Helen Gullett

Hello The Cut Shoppe friends... Helen is back here today with another fun DIY projects using The Cut Shoppe Cutting Files.


Personalizing items are fun, special, and perfect for gifts and even for yourself to use. And... thankful for digital cutting files, you can create any thing and any style with them.

My projects today are a Personalized T-Shirt and Personalized Coffee Mug using the Brush Up Alpha, the Bountiful Blessings, and the Java Scripts.


On the t-shirt, I created the words, Grateful and Caffeinated, using the Brush Up Alpha set. First, I opened the files in PNG using my Silhouette Studio Designer Software. Then I traced them to make the cutting lines. I released the compound path for all of them, and then picked the letters I wanted to use for the words, then create compound path again.

Next step is I arranged them slightly overlapping each other, and then weld.

For the Blessed arrow word, I simply opened the PNG file, then traced the image, then released compound path of all, and then created the compound path just for the Blessed arrow word.

I measured the width and length the space I wanted to put the cut out vinyl on the t-shirt. I arranged all the all the words, resized, grouped, and then resized again to fit the size on the shirt.

Alway to remember that when you work with Heat Transfer Vinyl (HTV), ALWAYS REVERSE your image before cutting it. I cut it out using the black glitter heat transfer vinyl, I added a pillow case on top of the shirt, and then using my iron (hottest setting, no steam) to transfer the image on my shirt. I pressed the top and I pressed again from the back. It is about 20-30 seconds each press.


And for the mug... to create the cutting files, I followed the same step I did for the Blessed arrow word. I resized the image to fit on my coffee mug.

I cut the image out using the purple glitter HTV. Before adding the cut out HTV on the mug, make sure you clean the mug with alcohol wipe to remove all the residue and dirt.

I added the cut out HTV on the mug, and I used my iron to transfer the image. I did it directly on top of the plastic carrier, no pillow case layer. I pressed longer that I did on the shirt. And also I only used the tip of the iron. I lifted up the plastic carried often to make sure the HTV was glued on the mug.

After all image transferred well on the mug, I secured it with Mod Podge Dishwasher Safe. Using this Mod Podge, to make sure it can be washed at Top Rack Dishwasher. But it takes about 30 days to cure before you can put it in the dishwasher. So if you plan to make this mug for presents, plan ahead... especially for Christmas, it is great time to start planning and making :D :D :D

Here are all the cutting files I used on my projects today:


I hope these projects give you some inspirations to keep creating with The Cut Shoppe cutting files. THANK YOU so much for stopping by today. Have wonderful day!


Friday, January 13, 2017

Colors

Hello there scrappy friends,

Zsoka back with you today with a new layout. I started out by selecting a collection I wanted to work with. This is one of the last Basic Grey collections that came out earlier this year. I'm yet to use the last BG collections, I haven't had a chance yet.

Then I looked at the cut files and for some reason this one jumped out at me. I haven't used it yet! 


I multiplied the heart cut file and arranged them in a curved way, then welded them. I backed the hearts with differemt patterned papers. I wanted to only have patterned paper on the left side of my layout, so I adhered my cut file to it and cut off the right side. Then I adhered this piece to a white card stock.


I wanted to bring in more yellow, so I painted around my cut file. I also added a lot of tiny yellow splatters to create a sort of bridge between yellow and white if that makes sense.


I added a few enamel dots from the collection and I selected some wood veneers too from my stash because I barely have any embellies from this collection.


To finish off my layout I added a couple of stickers, labels and my title, wrote my journaling and stamped my date.


Thanks so much for stopping by today. Have an awesome day! X


Monday, November 28, 2016

Fall in Love

Good Morning Cut Shoppe fans!  Wendy here today to share some inspiration using two of the cut files Ashley has designed for the fall season.  We don't have fall here in FL, but with a little bit of creativity, any products/sayings will work.


I have used the Hello Fall cut file as my main inspiration for this page.


I then built a diagonal through my page moving from the top left dear cluster


to the bottom right title cluster.  I tied the diagonal in together with the use of the cut file, Bountiful Blessings, heart cuts in a dark grey color.


I love that I was able to use the Oakley Avenue collection designed by Ashley at Pretty Little Studio for my non fall page, and still enjoy the warmth that fall colors bring!  Make sure you stop by 
The Cut Shoppe etsy and see all the great cut files that are available.


Thursday, November 3, 2016

Gather Together

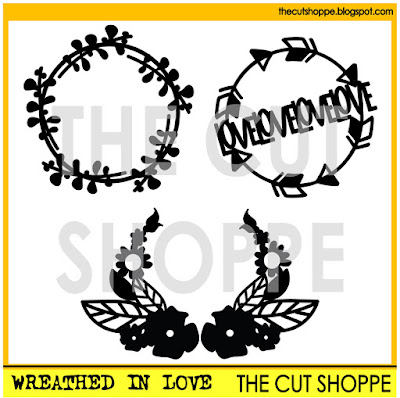
Halloween has come and gone, and now it's time to look forward to Thanksgiving!  We have opportunities all throughout the year to be thankful, but it's especially prominent during the month of November.  So to help you celebrate your thankfulness, this year, we've got four, new cut file sets that are available today!  I used the Wreathed In Love and Bountiful Blessings cut files, to create a Dream Catcher look on my layout and I loved the end result!


https://www.etsy.com/listing/475796308/the-wreated-in-love-cut-file-set?ref=shop_home_active_1

https://www.etsy.com/listing/475794780/the-bountiful-blessings-cut-file-set?ref=shop_home_active_4

I started the layout, by drawing 7 circles in Silhouette Studio, using the ellipse tool.  I wanted a stitched look in the center of my Dream Catcher.  I used the Silhouette Sketch pens to draw the circles and then I stitched around each one with embroidery floss colors that coordinated with the Gather collection from Maggie Holmes.


Once my stitching was finished, I cut the wreath and feather designs from the Wreathed In Love cut file set and the Bountiful Blessings cut file set.  I placed the wreath over the stitched circles and then machine stitched around the wreath.  I also added machine stitching to the feathers and the leaves from the Gather ephemera pack, before placing them on the layout.

  
I didn't want to cover the center of the Dream Catcher design with my photo, so I decided to place it under the circle area and to the right of the feather/leaf cluster.  I used chipboard pieces from the Gather collection to create my title and layered them over the photo.  Since I used a White cardstock for the background, I decided to bring in some more patterned paper, with several strips along the left and right sides of the layout.  And I finished with a small amount of splattered Black Color Shine.

This was my first time to try a Dream Catcher design on a layout, and I really loved the end result!  This week's cut files are perfect for putting your own Dream Catcher together.  And there are even more designs available, that you can check out in The Cut Shoppe Etsy store!

https://www.etsy.com/shop/TheCutShoppe
   
Do you have a favorite design this week?  We would love to see it on your next project, so if you pick up some new cut files, make sure you share on Social Media and tag The Cut Shoppe.  You can also link up for our November Cut It Out challenge, for the chance to win a $10 Gift Certificate to the shop!

https://ashleyhortondesigns.blogspot.com/