Showing posts with label beach bum. Show all posts

Wednesday, April 10, 2019

"Favorite" with Kira

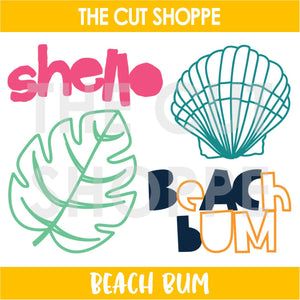
Hey again!  It's Kira and I am back with another 8.5x11 scrapbook layout featuring one of my favorite cut files from The Cut Shoppe, Beach Bum.


Beach Bum


I started this layout with the idea of making my page look like a giant polaroid picture.  And if I'm being completely honest, it didn't exactly turn out as I envisioned it would.  But that's okay, because I tried something new and I don't hate the outcome.  But basically I started the layout with an 8.5x11 piece of white cardstock and cut a 7x7 square to make it look like a giant polaroid frame.


Then I cut out the palm leaf from Beach Bum, also in white cardstock, in a few varying sizes.  I backed all the leaves with either a mint leaf paper, or an aqua leaf paper from the MME collection, Palm Beach.


I layered the leaves under the frame and over my photo (which I had sized at 6x6).  I also tucked in a few of the die cut flowers from the Palm Beach die cut pack.  After adding the flowers, the bottom half of my frame looked really plain!  This is where I sort of regretted going with a white frame and thought maybe a patterned paper would've looked better?


Anyway, I decided to jazz up the bottom a bit with some fussy cut palm leaves from a patterned paper, along with my title and some more die cut pieces from Palm Beach.


Thanks for stopping by!

Kira


Saturday, July 28, 2018

So Lucky TN Spread with Neftali

Happy Saturday scrappy friends! It’s Neftali here with you today to share some scrappy inspiration. Today I have a super duper quick Travelers Notebook spread using the Beach Bum cutfile set below using gelatos and a fun trick to mix them into your Travelers notebooks!


I only used the sea shell cutfile out of the Beach Bum set for this project. 

Before I continue, let me show you the finished spread:


It’s a super simple spread that I decided to create to keep the main focus on this stunning photo of the sunset here in California. I also chose my colors from the photo and kept it to a monochromatic gold. 
So for my background I brought out some more Gellatos in a copper, gold, and peach color. 

I didn’t use water at all, instead, I used my fingers to rub out the color. It works wonders, too. The warmth of your fingers helps rub out the creamy crayons, and since were working on such thin pages from the TN notebook, this is a perfect technique to add a bit of color on your backgrounds.


I also used the gelatos to color over the cutfile and it just gives it the perfect pop off the page and the colors of the background.


Not only did I use the gold color schemes gellatos but I also added some gold shimmer spray. Then I was ready to add my photo. I just cut that to add to both sides of the spread, instead of folding it, and I finished it off with some gorgeous gold glitter Thickers with the phrase, “So Lucky.” Because seriously, there’s no other feeling you get standing at the foot of this glorious sight. 


So, lovelies, this was pretty much all I did to create this TN spread. It came together very quickly, and I am actually currently loving popping into my TN or other projects to create simple projects that include new and fun techniques. I hope I have inspired you all to grab this cut file and give it a go for those summer photos you might have.

Thanks for stopping by today! 


Monday, July 9, 2018

"Rockport" with Kira


Hey Cut Shoppe friends!  It's Kira and I am back today with a layout in my beach themed travelers notebook.  We recently took a trip to the beach for the first time since moving to Texas, and of course I took a million pictures of my kids.  I thought the best way to handle all of the photos would be to make a TN style mini album. 


I'm so excited about the beach-y themed cut files in the shop, they are perfect for my beach pages.  I started with the Beach Bum cut file and cut out four of the sea shells.  I sized them to about 3.5" and then backed them with different, coordinating papers. 


The photo I decided to use is one of my son walking into the ocean, and there is a lot of white space to the right of him in the photo.  So I placed the photo on the left side of my TN spread.  This helped me choose placement of the sea shells.  I went with a diagonal design, starting in the upper left corner, moving down to the lower right.


Three of the sea shells I adhered directly to the page, and some were hanging off the edges of the page.  I bumped my photo up on foam, and so the shell that is on top of my photo is also up on foam.


I added my title in some gold thickers, and embellished with some summery items I had laying around my desk.  I finished it off with some gold color shine.


Thank you so much for stopping by!


xo, Kira 

Tuesday, June 26, 2018

It's All Good Layout with Neftali

Hello there, it’s Neftali back with you today to share another layout using the “Beach Bum” cut file set that went live on the shop on the 14th of June. Have you seen it? It’s perfect for recording your summer and coastal adventures!
I only used the gorgeous leaf cutout and used that as a focal point to my page that I am sharing with you today.

Here it is, a personal layout to remind myself that “it’s all good”:
As far as what my focus was when creating this layout, believe it or not, it was all about using some of my favorite summery supplies and just having fun. 

I only worked with my creativity taking the lead. I didn’t think much about where I put things, and I don’t even remember having a plan when I started. I simply put pretty on pretty together and came up with this fresh summer layout.


I used a watercolor sheet of paper this time around, as well. So you might notice that it’s a bit off-white. But I did add some pink watercolor streaks and splatters, so that the green color the leaf can really pop! 

One of my favorite details was adding the vellum trim with those cool tribal looking patterns behind and under my photo. It’s seriously my favorite part of this layout, even though it’s such a small detail.

For the rest of the embellishing around my photo, I used a mix of Crate Paper’s Good Vibes, Here + There, and Oasis. They mix together incredibly well!


To anchor everything I added some patterned paper strips to the bottom border of my page and ruffled those up to give some fun texture.


Plus, another fun cluster of embellishments on the bottom left of that border. I couldn’t resist not adding some cactus details, plus they went so well with the green of the leaf.


So, friends, that is my layout for today! I want to invite all of you to just grab some of your favorite supplies and get crafty with a cutfile. Sometimes you just gotta create something fun and random to bring back that flow of creating (psst..one of my secrets!).

Well, that’s it from me today. I will be back once again next month to share more fun inspiration using the awesome cutfiles from the shop! Until next time, stay crafty! Xo