Showing posts with label Endless Summer. Show all posts

Sunday, August 12, 2018

"Together" Traveler's Notebook Spread | Donna Espiritu

Hello, loves! Donna here to share my first project for August using some TCS cut files and printables.

I created a TN layout using items in the TCS Store perfect for Traveler's Notebooks.


I trimmed a bit of the TN Endless Summer printable and corned punched all 4 sides.


I used 2 of the printables in the set to back the title and cover cut files.
Since I used a white cardstock to cut both cut files, I inked the edges with light green ink to make them more visible.


I also used one of the cover pages in this set


I added a bit of texture and colors to the background by stamping and splattering spray mists since I used mostly light colored prints.


That's all from me today.
I hope this project inspired you to create something today.
Thanks for dropping by!

Happy crafting,


Friday, August 10, 2018

So Happy Together | Marsha Farris

Hello friends!  Marsha Farris here sharing my first project with you as the newest member of The Cut Shoppe Design Team!

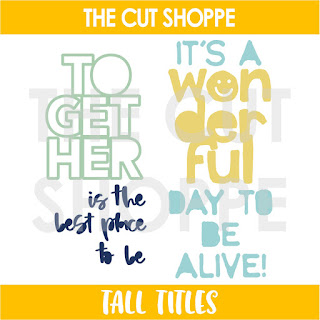
I was so excited to create a spread in my ringed traveler's notebook album using the new Endless Summer Printable and the Tall Titles cut file that were both added to The Cut Shoppe earlier this week.


I opened the Endless Summer Printable in Photoshop and mirrored the Afternoon Rainbow Printable paper so the rainbow border would be the same on both sides of my spread.  I also removed the word "noted" that was a feature on the paper.  I cut out the Tall Titles word "together" using the Picnic Blanket Printable paper and backed it with graph paper, one of my favorite prints to use in my TN.

I adhered an acrylic heart and used some puffy letter stickers to finish off my title.


The photos I used were taken at my family's pond during our annual photo session.  It's always fun to capture some silly shots of my guys.


I used a variety of die cuts on my layout, adding foam to some of them for dimension.  I also added enamel dots, puffy stickers, and stamped the date and the "thankful" sentiment on a couple of the die cut pieces.


I have enjoyed sharing my first TCS project with you!  Thank you for stopping by today!


Thursday, August 9, 2018

New Cut Files | Together Is the Best Place to Be

Hello, and happy NEW Cut File day!  We've got a great variety of designs, for you to choose from today!  Lately, we have been adding designs that work great in your Traveler's Notebooks, but could be used for other projects too.  So make sure you check out all of the cut files and our new Printable!  I combined the new Tall Titles cut file with the Endless Summer Printable, for a layout in my Traveler's Notebook.


https://www.etsy.com/listing/634903143/the-tall-titles-cut-file-can-be-used-for?ref=shop_home_feat_3

https://www.etsy.com/listing/621069074/the-endless-summer-printable-can-be-used?ref=shop_home_feat_4

When I sat down to work on this TN layout, I knew I wanted to use the Pickin' Flowers Printable paper for one side.  I thought about what would coordinate best with it, and went with the Simple & Sweet collection from Pinkfresh Studio. I used the Pickin' Flowers pattern on the right hand side of my layout, and went with White for the left hand side.  I wanted the left of the layout to be less busy, because I planned to use the Tall Titles cut file to create a large title, that could be backed with one of the patterned papers from Simple & Sweet.


Once I had the title finished, I placed my photo on the right side.  I printed it in Black & White to add a nice contrast.  Then I used some embellishments from the Simple & Sweet ephemera pack.  And I thought it would be fun to stamp a few sentiments on the ephemera labels, using the 2018 Summer of Sketches Stamp from Studio Calico.  I finished the layout with a few coordinating enamel dots, and a puffy sticker layered over my photo.

I hope you've been inspired with some ideas for using our newest cut files!  Make sure you visit The Cut Shoppe Etsy store to check them all out!  Thanks so much for stopping by today!

https://www.etsy.com/shop/TheCutShoppe

https://www.instagram.com/ashleyhorton75/

Saturday, April 22, 2017

Summer Fun

Hi All,

Zsoka here with you today to show you my latest layout I've created for The Cut Shoppe.

I chose the Geo to Go cut file this time. I love this cut file, it's not the first time I used it!

https://www.etsy.com/listing/201043453/the-geo-to-go-cut-file-is-a-12x12?ref=hp_rv
  
I decided to go with the wonderful summer collection, Endless Summer from Cocoa Vanilla Studio. I am not so into pastels but this collection is a dream to work with, I am glad I bought it! It simply makes me happy. Every single piece! What I love about CVS the most is the big variety of embellies with each collection. My favourites are the woodies, I may or may not have bought 3 packs of them :D.


I started out by backing my cut file with different patterned papers as usual. This took me a while, so I was watching Jane the Virgin in the meantime. Have you guys seen it? Hilarious. I used to watch telenovelas as a kid, because that was pretty much all we had on TV back then, ha! Anyhow, back to topic.

I printed a big size photo for a layout and I only have 12x18" photo paper, which I normally waste...But this time I actually took the time and figured out how to fill it up and print more photos on it in all sorts of sizes. Well this one is a bit of an odd size, I just enlarged it to fit in the last bit of white space I had left.


I put some tissue paper behind my photo and adhered it to my background. I then cut a frame from the ephemera pack in half and glued these in two corners of the photo, just to add a little something. My title is also from the ephemera pack, I glued SUMMER directly onto my photo and added some pop dots to the FUN die cut to raise it up a bit. I attached a small die cut with a clip - this is the only thing on the layout that is not from Endless Summer. I believe this is from Freckled Fawn. Also a woodie found its new home in this corner!


There are a few hibiscus die cuts in the ephemera pack and they are so gorgeous! I tucked them under my photo on the top and on the left. Some of them I popped up to give them a bit of dimension.
I then added some more ephemera pieces to the left side of my photo, plus a puffy camera and a woodie. Of course!


One of the Geo tags I filled with enamel shapes and yet another woodie. :)


To finish it off, I stamped my date and added some black ink splatters. No journaling on this one since I scrapped several photos from the same day!


Thanks for stopping by today, I hope I could inspire you X