Showing posts with label Elsie Robinson. Show all posts

Saturday, August 18, 2018

'A Little Magic' Scrapbook Layout | Elsie Robinson

Hey TCS fans, it's Elsie here! One of my favourite cut files in the TCS store is The Open Letter alpha set. I love creating layouts with large titles and backing cut files with patterned papers, so this cut file set is perfect for me!


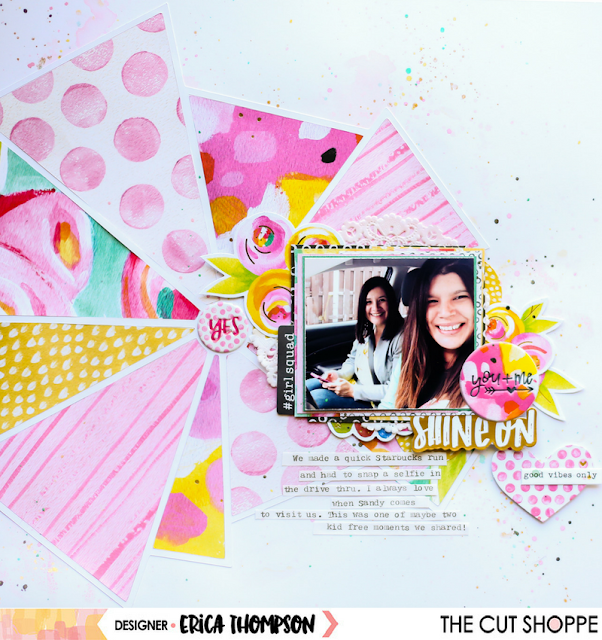
I recently just got some of new Maggie Holmes Willow Lane collection and I wanted to use as many patterns as I could, so I found a cute Roald Dahl quote on Pinterest and cut all of the relevant letters from white cardstock.


I backed each letter with a lot of my favourite patterns to create a really colourful and whimsical design. This is such a simple, but effective technique!


Embellishing was pretty easy as I could colour match the embellishments with the letters to create a very detailed but fun page.


And to make the letters shine even more, I popped up the entire quote up with some foam dots.

Thanks for stopping by, I hope you give this awesome cut file a try!


Thursday, July 19, 2018

Cool In The Pool Layout | Elsie Robinson

Hey everyone, it's Elsie here! Did you know that The Cut Shoppe offers a free cut file every month, right here on the blog? I love a big, bold title and so this months cut file is one I just had to make a layout with! You can click this link to find the free 'Cool In The Pool' cut file.


For my layout, I oversized the cut file to make it stretch across the entire page, and I rotated it slightly which I find created a more balanced design, and I cut it from white cardstock.


I then backed each letter with a different patterned paper, to create a really colourful design. Also because these letters are so big they're the ideal spot to back with a photo.


To make the cut file stand out even more, I used a brick patterned paper as my background. I love how much of a statement this makes!

And finally I went a little crazy with a lot of pool/summer themed embellishments, because big title designs are ideal for stash-busting because you can create a lot of embellishment clusters.


I had so much fun making this page, so I hope you also are inspired to create a layout using this cut file!


Wednesday, July 4, 2018

Campervan Adventures! | Elsie Robinson

Hey friends, it's Elsie here! I have a really fun layout to share with you today using one of the new cut files available in the store: Wheels on the Bus.

Paper-piecing is my favourite scrappy technique and so I was really excited to use this cut file. But this cut file is especially great to use if you're a paper-piecing beginner!


Once you've download the cut file, you'll see that all of the individual elements you'll need to piece together the campervan image are already seperated. This means that all you have to do is choose the patterned papers you want, send them to your cutting machine and glue them together! It's so easy and the cut file takes all of the annoying guess work and measuring out of doing a paper-piecing technique!


However, if you don't have a cut file machine you can also recreate this campervan image. You could print out the individual pieces of the camper, trace around them and cut them from patterned paper with some scissors. It will obviously take a little longer, but you will get very similar results.


And to add more detail I hand-stitched around the camper to add some cute and whimsical detail.

I also sized the cut file quite large, so it would be the main design element on this page. This meant that all of the embellishing was very quick and simple, as I didn't need to add much to finish off this page!


I hope you also give this cute paper-pieced campervan cut file a try on your next project!


Wednesday, June 20, 2018

Shello! Layout | Elsie Robinson

Hey friends, it's Elsie back again with another 12x12 layout to share with you! This time I'm using another one of the newest items available in the store: The Beach Bum cut file set.


As soon as I saw the shell cut file, I knew I had to make a page with it. I love anything to do with the ocean so this cut file set is one I will get a lot of use out of!


I cut the shell from white cardstock and sized it to approximately 8x8 inches, as I wanted it to be the stand-out image on this layout. I backed each section of the shell with different patterned papers from the Dear Lizzy Stay Colorful collection.


I love backing cut files with patterned paper, as it helps all of the contrasting patterns and colours on the papers work together... It's a totally foolproof technique!


I created a land/sea scene around the shell, and made sure all of the scenic elements and my photo were touching the shell. This creates a more cohesive design as the large cut file helps join all of these separate elements together.

I hope you're inspired to grab The Beach Bum set for yourself and create lots of Summer pages!


Tuesday, June 19, 2018

Globe Getter Layout | Elsie Robinson

Hey friends, it's Elsie here! I have a 12x12 layout to share with you today, using one of the new cut files available in the TCS store: The Globe Getter.


Before sending the cut file to my die-cutting machine, I edited the file a little. I used the knife tool to separate the 'O' globe from the rest of the letters and made it about twice as large. I wanted the cut file to not only take up the width of the page but also the height, which helped fill out the page to create a more balanced design on this 12x12 layout size. 


I love using 'wordy' cut files on my layouts because it means that I can back each letter with a different patterned paper. It's fun to use loads of different patterns to create a really neat but colourful design. I used papers from various Crate Paper collections to back the letters and the globe.

And of course I ended up hand-stitching around the white borders to give some more texture and dimension.


I clustered most of the embellishments around the letters, to create a cute and whimsical look. I also cut a "swoosh" curved line (not sure what else to call it!) and glued an aeroplane sticker to the end which made it look like the aeroplane is flying around the world!


And finally I used a geotag chipboard sticker to mark where my photo was taken - I love how the globe is not just a decorative element but it's also practical!!


Sunday, May 20, 2018

Counting Stars Layout | Elsie Robinson

Hey crafty friends - it's Elsie here! I have a bit of a different layout to share with you today, as I was inspired by the Counting Stars cut file to create an 8.5x11 sized layout, rather than my go-to 12x12 size!


Although this cut file could easily be copied and pasted to work on a 12x12 page, I really love how the stars are arranged in a vertical cluster, so I decided to give the 8.5x11 layout a try. And I am so pleased with the results, this is definitely something I will be doing again!


I cut the cut file from some 12x12 white cardstock as I wanted it to be a little bigger than my 8.5x11 layout, so the stars would stretch right to the edges of the page.


I backed each star with a patterned paper from the Dear Lizzy Stargazer collection, and I even used strips of navy washi with copper accents to back some of the stars for an extra bit of shimmer!


Of course I couldn't resist doing some stitching, and I hand-stitched around all of the stars with some white thread. Once that was all done, I popped the cut file up on some foam and went a little OTT with the embellishing! But I was having way too much fun and didn't want to stop adding pretty things... I'm sure we've all been there, right?! ;)

Thanks for joining me today!

Wednesday, May 16, 2018

'Leaf It To Me' Layout | Elsie Robinson

Hey TCS fans, it's Elsie here again! For today's post I had a very simple idea to create a border of leaves on a layout, which was inspired by all of the flowers in the Maggie Holmes Flourish collection.


To create this, I chose the three leaf cluster from the Leaf It To Me cut file set and separated each leaf with the knife tool in my Silhouette software. I then cut the leaves from white cardstock and backed each of them with a different patterned paper.


Since the leaves are such simple shapes, they didn't take long to back with the patterned papers. So in no time I was left with a very colourful pile of leaves!


I arranged them in a rainbow border around the edge of my 12x12 paper, and adhered them with some foam to create some dimension. I also made sure that the leaves overlapped each other to create a much more full and substantial looking frame!


This kind of design is perfect for using large photos. I only have a standard-sized printer, so I printed my photo onto some A4 paper, which luckily fit inside my leaf border. I also printed the photo in black and white, which contrasts nicely with the colourful cut files and makes them stand out even more!


I love the Leaf It To Me cut files, because it's such a versatile set to have in your libraries and it can be used all year round. So I hope you're inspired to use it on your next projects!


Thursday, May 3, 2018

NSD CHALLENGE NO. 1


Welcome to The Cut Shoppe's National Scrapbook Day 2018 (more than one day) celebration!!  We've got lots of fun things happening over the next four days, so make sure you check out everything in this post, so you won't miss out!

First thing's first!!...we've got four AWESOME, NEW, FREE Cut Files for our favorite people...that's all of you!  :)  You can download all four designs, by clicking on the graphic below.

https://app.box.com/s/g6fsei3ptyhwq36ypzuuob233lue7n7j

Next, let's get to the challenge details.

No. 1 - Our first challenge is BACKING A CUT FILE.  This is a fun technique and our Design Team has some great inspiration to share with you.

https://ashleyhortondesigns.blogspot.com/

http://heyelsie.blogspot.com/

https://www.instagram.com/ericarosecreates/

https://www.instagram.com/paddymack7777/
  
Now, it's your turn to play along!

Here are the details for participating in the Challenge:

1.  Create any project, using a Cut File/Cut Files from The Cut Shoppe...it can be any of our Free designs, designs from The Cut Shoppe Etsy store or our Exclusive Cut Files in the ScrapbookNerd online shopTHE MOST IMPORTANT DETAIL, IS THAT IT MUST BE A CUT FILE FROM THE CUT SHOPPE.

2.  Leave a link in the comments on this post to your project.

3.  Your project can be combined with other NSD Challenges happening this weekend.

4.  The challenge will remain open until midnight CST on Friday, May 11.  All entries must be submitted by then to be considered.

5.  One random winner will be chosen to win 20 FREE CUT FILES of their choice from The Cut Shoppe Etsy store! 

6.  All winners will be announced on The Cut Shoppe Blog on Monday, May 14th.  It is your responsibility to check back on the Blog to see if you are a winner!


Upload your projects on Instagram and TAG us, @thecutshoppe, and use the hashtag #tcsnsd2018.

One overall winner will be chosen from the hashtags, to receive 30 FREE CUT FILES of their choice from The Cut Shoppe Etsy store!

The winner will be tagged on Instagram, Monday, May 7th.  

And last, but not least.  We've got a 50% off sale on the entire store, through Monday, May 7th!  This is a great time to stock up on your favorite designs!

https://www.etsy.com/shop/TheCutShoppe

HAVE FUN, AND WE CAN'T WAIT TO SEE ALL THAT YOU CREATE THIS YEAR FOR NSD!  MAKE SURE YOU CHECK BACK EVERYDAY THROUGH SUNDAY, FOR MORE CHALLENGES!

 https://ashleyhortondesigns.blogspot.com/