Friday, August 31, 2018

Hello Fall | Helen Gullett


Hello everyone... We are at the last day of August already! Kids are back to school and Fall is on its way. It is one of my favorite seasons.

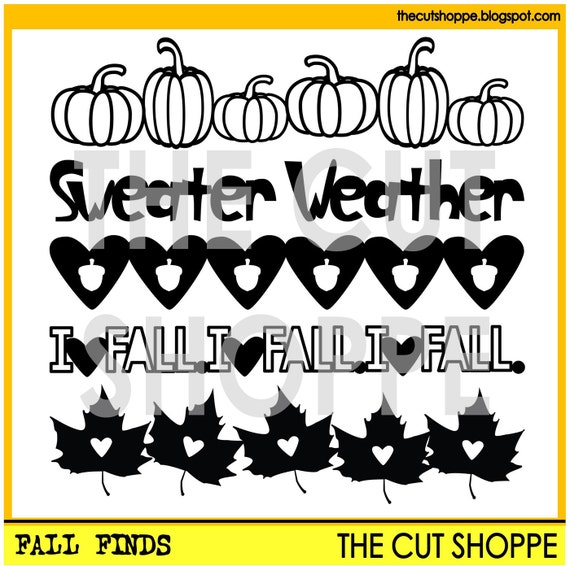
Welcoming Fall season, today I have a Fall themed card to share with you that I created using Fall Finds Cut Files and Oakley Avenue Cut Files.


I used Fall themed patterned paper that I have on my stash for the background. 

I use the pumpkin border from Fall Finds Cut Files and create the border for the card. I open the file with Silhouette Studio Software and ungroup them. I drew a rectangle.
I resized both the pumpkin border image and rectangle into 5.25" width. After that I weld them together.
I cut it with my Silhoeutte Cameo light using orange cardstock and then I added the backing cardstock using dark orange color. I trimmed the extra with micro-trip scissors.


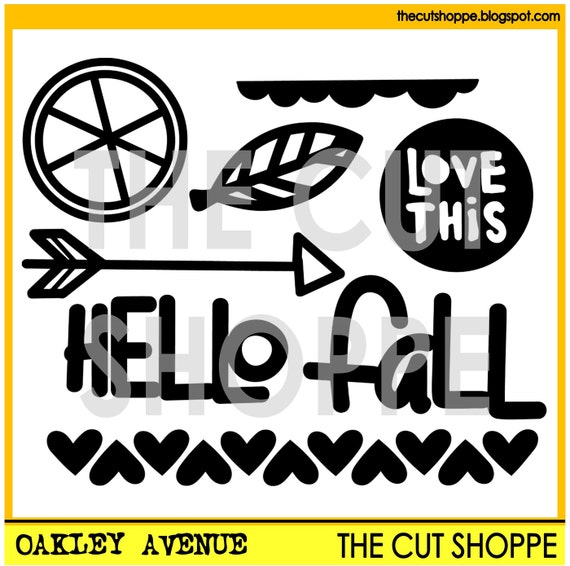
For the sentiment for this card, I used one of the phrases from the Oakley Avenue Cut Files. I opened the file and ungroup them. I grouped back the word "hello" and "fall" and then resized them to fit on the card.

I cut several of them with heavyweight white cardstock.


I decided to add some gold foil on the pumpkins. So, I added tacky glue on the lines using felt bullet tip glue pen (I used Martha Stewart brand). I let it dried till it turn clear and then I added the gold foil paper on it. Some of the glue dried completely but I kindda like how the gold foil on the pumpkin becuase of it. It look like distressed gold pumpkins now...

I added the patterned paper on the white card with adhesive glue, and then I added the gold pumpkin border. After that I added the sentiment at the space on the pumpkin border.

The card is done. I hope you all enjoy it and see you all next time!


Thursday, August 30, 2018

Back 2 School by Jill

Hello!  Who's in that back to school mode?  This girl!  I used this adorable Back to School file in The Cut Shoppe Etsy store to create a layout documenting my sweet girl's back to school haircut by our favorite hair dresser ever.

I always start my layouts with the cut file, and I adore this release!  I cut the title from white cardstock and then used several patterns to back all the letters; I used a 6x8 paper pad for this because the patterns are scaled down and work great for backing files.


Before gluing down the cut file title, I cut strips of paper 1/2 inch to 3/4 inch and glued them to my layout at an angle, following the angle I planned to use for the title.  I almost never do an angle on my pages and I'm so happy I did this time, my scrapbooks needed a change of pace.


After adding some machine-stitching along the paper strips, I added my photo and embellished with a sub-title and chipboard pieces.


I had a blast making this page, it's a bit out of the ordinary for me, but definitely still has my style.


Thanks so much for checking out my latest page!


Wednesday, August 29, 2018

Six Months for Xmas by Caroli Schulz

Hello there! Caroli here, and today I want to share with you a new layout I've made using some fabulous cut files available at The Cut Shoppe's Etsy store. 

This time I used the DIY Quilt as background and the Super Star Alpha for my title.  


I am a Christmas lover, I just can't help it! I listen to Christmas music the whole year and every June 25 I throw a party with my friends to celebrate the there are only six months left for Christmas, it's so much fun! This is what my layout is all about, here it is:


I backed just some of the spaces in the background cut file because I wanted a simple look, also because I loved this turquoise paper I used as base and wanted to see it through.


I used a foam dots and enamel dots to enhance some of the die cuts I used as embellishments, I think that volume is always is a good idea!


As I said before, for my title I used the Super Star Alpha, which I backed with patterned paper and embellished with some enamel stars and diecuts. Also, I stitched a bit with my sewing machine on some of the letters, in order to make the design more eye catching.  I completed the title with some enamel letters.


I love how funny and colorful this layout came out. I used Fancy Pants Design's Wish Season collection, of one my fave Christmas collections so far because i has a lot of pink and turquoise colors <3


I hope you liked this layout and get inspired, it's never to early to start thinking about Christmas, uh? Have a lovely day!!

Tuesday, August 28, 2018

Current Mood Layout with Neftali

Welcome back TCS fans! It is Neftali with you today, back to share some more cut file inspiration. Haven’t you all been loving the cut files? I totally have and that is why I’ve recently been playing with the older ones. I just can’t let some of them pass me without playing with them, even though there are so many gorgeous one coming out twice a month. Today I am playing with the “Untamed Heart” cut file shown below.


This design seems like a classic staple cut file to me, and I was so excited to be able to finally have it in my hands! I decided to use up some more of my favorite Crate Paper collections to create this layout:


As you can see, it’s just a big ol’ mix of Crate Paper goodness on a page. I used the CP Good Vibes, CP Here + There, and CP Wild Thing papers and embellishments to create it.

I decided to use a fun photo of myself from last summer just acting silly for the camera. The collections have so many mixes of patterns and colors that I felt they went will with the mix of patterns I am also wearing.

To add a special and more feminine touch to my layout, I added two small doilies to back my photo. I feel like they add the perfect female touch to these bold colors all around.


I was also super excited to use some black splatters from a brand new black mist I just recently added to my collection. It’s also a staple, and it pops so well against this page.


As you can see, I had sort of a diagonal set up around my photo from the title at the top left of the heart to the pink flower and glitter thicker leaves and the bottom right.


To add a little something to my heart cut file, I also added a mini cluster to the top right of it with matching colors and textures.


My final detail was to rip my page and create that popular peek-a-boo embellishment with a thicker heart inside of it on the bottom right of my page. I also added some staples and went back around my heart to add a few more staples in two more areas.


That’s all I did to create this fun layout. I loved using my mix of Crate Paper stash and finally using a cutfile that I have seen be recreated in so many ways throughout the years. I’ve got one for my own books now!

So, have I inspired you to grab your favorite supplies and create something fun with the “Untamed Heart” cut file? I sure hope so! Thanks for stopping by, friends! x


Monday, August 27, 2018

Back To School | Erica Thompson

Hello and welcome back to The Cut Shoppe blog!  Today I have a fun layout for you using the Back To School cut file available HERE!
I always take photos of the kids on their first day back to school and this year I took one of my daughter jumping in the air holding a Heidi Swapp light box and I just love it!  I pulled out one of my favorite collections right now from Pretty Little Studio Savannah Dreams and starting backing the cut file!  The papers in this collection are amazing and the colors are dreamy!  I think I purchased one of everything!
I wanted to do something fun with the photo so I punched it out in a circle shape and added it to one of the O's in the word school and I love how it turned out!
One of my favorite things to do with a big word cut file like this is to back all the little pieces with pretty colorful papers!  A white background is a must for me most of the time but I did add some fun splashes of color with some mists from my stash. 
This cut file is perfect for layouts but would be really cute in a mini book!  I would love to see what you all do with this file!  While you are in The Cut Shoppe make sure to check out the newest release of cut files!  You will love them I promise!  Here is a look at my completed layout using the Back To School cut file!
Thanks so much for stopping by today!  I look forward to seeing what you create with this file!  Remember to tag The Cut Shoppe on social media so we can see what you create!  Have a wonderful day!  For more layouts using Back To School check the link below!


Sunday, August 26, 2018

"Capture" Layout | Donna Espiritu


Hello, lovelies!

Donna here with a scrapbook layout using a couple of cut files from the shop


I backed the DIY Quilt cut file with a lot of pattern papers from the Gather collection by Maggie Holmes


I actually used the Gather digital elements since I don't have the ephemera pack anymore.
I mounted the printouts with foam tape for a bit of dimension.

For the Flower Power cut file, I cut it apart and created a layer around the photo to add give the layout more texture and dimension.


I scattered gold sequins for the final touch. 


I really love how this turned out!
How about you, do you like to use two different cut files in your layout/project?
I hope you give it a try!

Thanks for dropping by and happy crafting,


Saturday, August 25, 2018

Best Kid | Tarrah McLean

Hi there Cut Shoppe friends!

It's Tarrah McLean back with you and today I am sharing a new layout using the super cool DIY quilt cut file from the store!

I had lots of the embellishments left from the Crate Paper Cool Kid collection but only a few of the papers from the 6' x 6' paper pad so I decided that this was a perfect way to use up both even though I didn't have any of the 12' x 12' papers left. I cut the DIY Quilt cut file from plain white cardstock and once I had backed all the triangles with the papers, I simply backed the whole thing against some black cardstock.

The 12 x 12 DIY Quilt cut file

I also machine stitched on the diagonal along the top edge of the flat part of each triangle. I love the texture and added decoration it gives the page.

Because of the time and effort it took to back this cut file, I decided to not cover up too much of it and kept the embellishing to a minimum, mainly keeping the embellishments around the photo.

I love this DIY Quilt cut file as it has the potential to be suited to any theme layout whether that be a boy page like I have done, a travel page or even a pretty girls page. The opportunities with this one are endless! 

Thanks so much for stopping by today!

Happy creating!

Friday, August 24, 2018

Bible Journaling With Printable Files | Helen Gullett

Hello everyone... Helen is here. Today I have a couple Bible journaling pages to share with you all using printable files from The Cut Shoppe.

Here are the printable files I used on my journaling page today:


The Road Trip Printable you can grab this set at The Cut Shoppe Store, but the Summer Sizzle set, you can grab it for free when you join The Cut Shoppe Scrap Spot Facebook Group.


On my first Bible journaling page, I used both printable sets on my ESV Journaling Bible.
First, I open the files with Silhouette Studio Software, and then activate the Print-and-Cut feature on the software.
I printed the files with inkjet printer on heavyweight white cardstock and then cut them with my Silhouette Cameo.
That easy!

On my Bible page, I added some watercolor paint and dried it with craft heater. Then I added the printable pieces on the page with dries-clear adhesive glue. And then I wrote highlight verse that I want to remember in the journaling space.


On my second Bible journaling page, I used the Summer Sizzle set and the All Tied Up Alpha Cut File on my ESV Interleave Journaling Bible. It has large full page for journaling.


I cut the alphabet set with heavyweight white cardstock, and then I colored them with Gelato Metallic  Blueberry and waterbrush. I set them aside to dry.

While waiting, painted the grass at the bottom of the page using Gelato Green Tea and baby wipe. After the painted grass dried, I added the printable pieces on the page using dries-clear adhesive glue. Then, I added the alphabets on the pages saying Stand Firm and wrote the phrase "In The Lord" using Micron Pen.

I hope you all enjoy this simple post today. Thank you so much for stopping by!