Saturday, June 30, 2018

Expreso Yourself by Caroli Schulz

Hello there!! Caroli here, and today I want to share this layout I made using fabulous Espresso Yourself cut file.


I love coffee, its smell and its delicious taste, so when I saw this cut file I knew I had to make something with it to document my love for it. 

I still had some leftovers of Cream & Sugar collection from Doodlebug design, this was one of my fave collection last year and used almost all of it, but it was just perfect for the subject of my layout, so I had to figure out how to make the best use of the tiny scraps I had. 

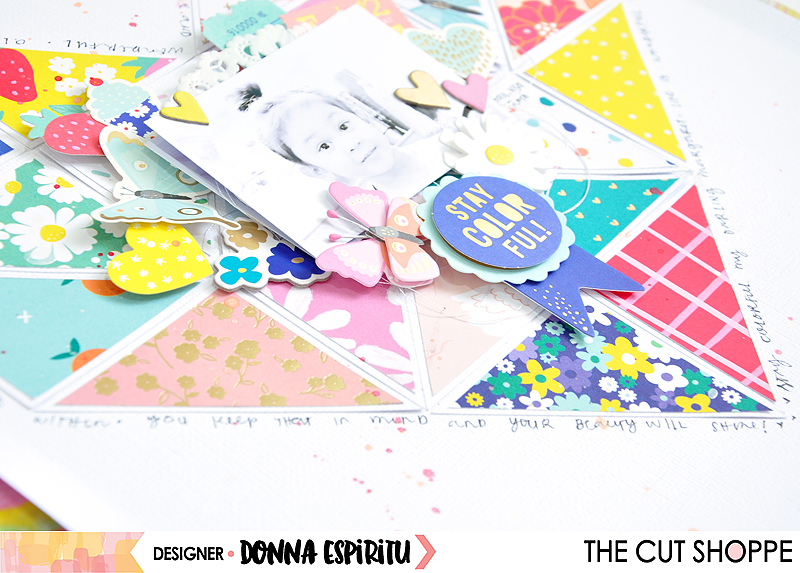
For this reason (and since I almost had no embellies of this collection) I decided to use the big title as main embellishment of my page, and loved the result! 


As you can see, I backed the title and also I cut some of the letters in patterned paper and adhered them over the cut file using some foam dots, with a nice volumen effect. 


I also used my sewing machine to stitch some of the letters too, love this effect and use it often.


Since most of the elements in this layout are on left side, I wrote my journaling on the right side, just to keep the balance of the design. I journal about how I love coffee and evrything coffee related, this was the perfect cutfile for this purpose!


I love this layout,it documents something that makes me happy, and it looks pretty as well.  I hope you liked it as well and got inspired to work on your scrapbooks, thank you for stopping by, have a great weekend!

Together | Donna Espiritu

Hello there!
Donna here today with a scrapbook layout using one of the newest cut files in The Cut Shoppe store.


I LOVE anything floral so when I saw this set of cut files, I knew I needed to use them right away! This was released yesterday, you can grab it in the TCS store.

I cut 3 different sizes of the 2nd flower on the top left and backed them with a pattern paper.


 I used foam tape to mount the backed cut files for a bit of dimension.


I also used the leaves in the set and resized them a bit smaller. 


Just a touch of watercolor wash added a bit of color to the background. 


That's all from me today! Thanks for dropping by!

Happy crafting,


Friday, June 29, 2018

Summer Flower Garden | Kelly Janes

Hey there friends! Kelly here with you today to share a new layout using the Flower Garden Cut File.


I typically will just "slice" apart a cut file as I go in Cricut Design Space, but in this instance I knew that I would use the flower portion of the Flower Garden Cut File over & over! I decided to upload this cut file twice into Design Space...Once leaving it just as it is here with the title Bloom & Grow & then a second time with only the flowers. This way all of the work will be done when I want to use just the floral portion of the cut file! [There is a step by step tutorial on how to do this included in the process video at the bottom of this post.]


I cut the cut file in white cardstock and then backed it with a light blue polka dot patterned paper. I positioned multiple summer themed embellishments to go along with my photo! This photo just screams summer with it's warm tones and the fact that we are enjoying dinner on the patio! HA!


Now you can take a look at my process video that includes a Cricut Design Space tutorial.


Thanks so much for spending part of your day with me and remember to head to the Etsy Store to check out all of the cut files!!


Thursday, June 28, 2018

New Cut Files | WKND Vibes

It's always fun to come up with new designs and ideas for cut files!  This week, we have some awesome travel and summer themed cut files available in the Shop.  There's also a new style of cut file...paper piecing!  The Wheels on the Bus cut file has all of the pieces separated for you, and ready to cut each part from your favorite patterned papers.  It also includes a solid base to build your cut file on, once you have all of the pieces cut...and I just had to use it for the layout I'm sharing today!


https://www.etsy.com/listing/609996462/wheels-on-the-bus?ref=shop_home_active_1

Isn't it the cutest??!!  I used the Crate Paper Here & There collection, and I love the way all of the different patterned papers work on the cut file.  I cut the base from White card stock and once I had all of the pieces put together, I also added some hand stitching.  The embroidery floss adds just the right little extra touch to the cut file.


I did bring in a patterned paper from the Crate Paper Wild Heart collection for my background.  It's one of my favorites and it coordinated perfectly with the Here & There collection.  I placed the cut file in the center of the layout, and then decided to work all of my embellishments and photo around it.


The photo is from this past weekend, when my hubby and I visited Laurel, MS, for our 19th anniversary trip.  It is such a cute town and I snapped tons of photos.  The photo on the layout, is outside of the Laurel Mercantile Co., and I knew it would fit right in with the Wheels on the Bus cut file.  I placed it at the bottom of the layout and then added the title to the top of the layout, to create balance.  Then I used a mix of embellishments from the Here & There collection to complete the look.

There are some other awesome cut files available this week, and I can't wait to use them on upcoming projects.  You can find them in The Cut Shoppe Etsy store, so head over and "check" (as in, adding them to your shopping cart!!) them out!!  :)

https://www.etsy.com/shop/TheCutShoppe

https://www.instagram.com/ashleyhorton75/
 

Wednesday, June 27, 2018

Cute | Tarrah McLean

Hi Cut Shoppe friends!

It's Tarrah McLean back with you and today I am sharing a new layout using the new Untamed Heart cut file found in the The Cut Shoppe Etsy store

I have lots of Crate Paper goodies in my stash so I pulled out some of the Gather collection, as soon as I saw the plaid background paper I have used here I knew the Untamed Heart cut file would be perfect for this paper.

I cut the cut file out of a cardstock I didn't care too much about, once cut I pulled up the entire outer edge piece, I then washi taped it to the background paper to use as a guide for where each triangle was going to be placed. The triangles I left on my mat as they were, using these as templates for the inside pieces on my background paper. I was able to use up lots of my already cut up papers and traced the template ones on to the patterned paper ones. 

Once all the triangles were adhered in place, I machine stitched around the outside of the heart and through the middle and around each triangle also.   

This photo is of my youngest niece who is 1...isn't she adorable!? I just love this photo of her in her cute little tartan skirt! This collection goes with this photo perfectly. I used very few embellishments once I had the heart finished and the photo placed as I didn't want to cover up the heart too much.  

Thanks so much for stopping by today!

Happy creating!


Tuesday, June 26, 2018

It's All Good Layout with Neftali

Hello there, it’s Neftali back with you today to share another layout using the “Beach Bum” cut file set that went live on the shop on the 14th of June. Have you seen it? It’s perfect for recording your summer and coastal adventures!
I only used the gorgeous leaf cutout and used that as a focal point to my page that I am sharing with you today.

Here it is, a personal layout to remind myself that “it’s all good”:
As far as what my focus was when creating this layout, believe it or not, it was all about using some of my favorite summery supplies and just having fun. 

I only worked with my creativity taking the lead. I didn’t think much about where I put things, and I don’t even remember having a plan when I started. I simply put pretty on pretty together and came up with this fresh summer layout.


I used a watercolor sheet of paper this time around, as well. So you might notice that it’s a bit off-white. But I did add some pink watercolor streaks and splatters, so that the green color the leaf can really pop! 

One of my favorite details was adding the vellum trim with those cool tribal looking patterns behind and under my photo. It’s seriously my favorite part of this layout, even though it’s such a small detail.

For the rest of the embellishing around my photo, I used a mix of Crate Paper’s Good Vibes, Here + There, and Oasis. They mix together incredibly well!


To anchor everything I added some patterned paper strips to the bottom border of my page and ruffled those up to give some fun texture.


Plus, another fun cluster of embellishments on the bottom left of that border. I couldn’t resist not adding some cactus details, plus they went so well with the green of the leaf.


So, friends, that is my layout for today! I want to invite all of you to just grab some of your favorite supplies and get crafty with a cutfile. Sometimes you just gotta create something fun and random to bring back that flow of creating (psst..one of my secrets!).

Well, that’s it from me today. I will be back once again next month to share more fun inspiration using the awesome cutfiles from the shop! Until next time, stay crafty! Xo


Monday, June 25, 2018

♥True Love Captured | Shannon Morgan♥

Happy Monday! 

I'm sharing a layout of my sweet Lucy with you today. She loves laying in the sun, often reluctant to come in the house, she throws herself down in the yard and refuses to get up. I laugh every time she does it and finally got some good pictures of her pouting. 


I created this layout using the Say Cheese cut file:


Here's a close up of some of the awesome cut files available in this set:


Thank you for letting me share!
Hope you have a wonderful week ahead and keep checking the blog for amazing inspiration ♥

Sunday, June 24, 2018

My Tribe by Jill

Hey crafty friends, it's Jill with a new mixed media layout featuring the Flock of Feathers file from The Cut Shoppe Etsy store!

I began this layout by covering my 12x12 white cardstock with clear gesso; once dry, I added tons of different spray ink colors.  I would add the color in a few spots on the cardstock, dry it with a heat tool, then add another layer of color.

I cut the Flock of Feathers file as large as I could on my Silhouette, also from white cardstock.  I wanted those beautiful feathers to pop off the mixed media background.  I trimmed about a half inch off the colorful background; the feathers and mixed media paper were then adhered to patterned paper, and I used my sewing machine to stitch around the perimeter.


Anytime I do a large background file I tend to keep the other embellishments simple.  After adding my photo to the page I placed a few die cuts around it.


I added a few cross-shaped die cuts around the page too.


This is a photo of my niece and I at a rap show, and I thought the funky colors of the photo meshed well with the mixed media work.


Thanks so much for stopping by TCS blog today!

Saturday, June 23, 2018

Stay Colorful | Donna Espiritu

Hello, crafters! Donna here with my take on one of The Cut Shoppe's files, "The Untamed Heart" cut file.


I love how super cute my layout turned out!


I cut the file twice. I cut the file first using the papers from the Stay Colorful collection by Dear Lizzy. 
Then I matted the colorful triangles with a white cardstock. I lifted some of the edges of the triangles so it's not totally flat on the surface.
I mounted the photo on foam tape and placed a mixture of flat/layered stickers and chipboards as embellishments. Using a black Micron pen, I wrote the journaling around the heart.
Lastly, I splattered pink, coral and white misting sprays while the photo is covered, for some messy texture.

That's all for now and I hope you liked my layout!

Thanks for dropping by and happy crafting,