Wednesday, October 31, 2018

HAUNTED HALLOWEEN!

Happy Halloween everyone!!  The Design Team has stopped by today, to share some hauntingly good inspiration with you!  We also have a SHOP DISCOUNT and FREE CUT FILE for you, so make sure you read through the whole post to check everything out!

Let's get started with the layouts created by the Design Team, using a variety of Halloween themed Cut Files from The Cut Shoppe Etsy store.  You can find the cut files under the Holidays section in the Shop.


https://www.instagram.com/ashleyhorton75/


https://www.instagram.com/happy_arty_days/


https://www.instagram.com/orangegearle/


https://www.youtube.com/channel/UCrBrH-ZoOq7U1y1xxlccneA


https://scrappykiraness.wordpress.com/


https://www.instagram.com/heymarshamakes/


https://www.instagram.com/mmgallant76/


http://larkindesigntm.com/


https://www.instagram.com/victoriaandherplanners/?hl=fr

I hope you've found some inspiration from all of these amazing projects from our Designers!!  I love each and every layout!

Now it's time for a Halloween treat, just for YOU!  You can download the FREE Let's Boo This Cut File, by clicking on the image below.

https://app.box.com/s/n542d3n3c932nnqothcn2irck3sntezx

And that's not the end of our Halloween fun.  TODAY only, we are offering 31% off of your purchase, using the Discount Code BOO31!  This Discount is for all of the items in the Shop, so make sure you pick up all of your favorites!

https://www.etsy.com/shop/TheCutShoppe

Thanks so much for stopping by for The Cut Shoppe Haunted Halloween!  We hope you have a howling good day!

Tuesday, October 30, 2018

Give Thanks | Victoria

Hi friends, Victoria here today to show you my last project for The Cut Shoppe.

November will be here very soon, and it's the perfect time to feel thankful and grateful for the beautiful things in our lives.

Here's a layout I made, using the Thanks and Giving cut file from the shop.


I used the new collection from Pebbles / American Crafts : "Along the way".
I choose a white cardstock for my background and a black patterned paper for the cut file.


Then, I made a background with my distress oxydes ans some Shimmerz Spray. I tries to pick the same colors as in the collection.


Then, I added few embellishments : die cuts, stickers and enamel dots.
I also placed another patterned paper behind my cardstock to add a little dimension to this layout.


Hope you'll like it!


See you soon,


Monday, October 29, 2018

One Cut File Two Ways | Two Halloween Layouts Using Trick Or Treat!

Hello Lovelies, Theresa here to share with you an example of how I used one cut file, one sheet of card stock, for two layouts! This is a fun way to get more mileage out of each cut file. I am working with the Cut Shoppe Trick Or Treat file, which you can purchase at the link The Trick Or Treat Cut File.


Here are the two layouts I created from this amazing cut file!


I chose a purple card stock I had in my stash for these layouts, because who can resist purple? I began with the actual cut file and sat down to work on the first layout. My photo is our son Addison, from 2015, when he dressed up as Slender Man. 


I took color cues from his black and white costume, so I began with this patterned paper from the Pink Paislee Auburn Lane collection and added really rough brush strokes and paint splatters using white acrylic paint. This created my background.


Once my background was fully dry, I backed the cute file with a colorful but still mostly white patterned paper from the Echo Park Bewitched collection. This patterned paper ties in beautifully with the other elements in the layout, and sets the tone for the color palette of the layout.


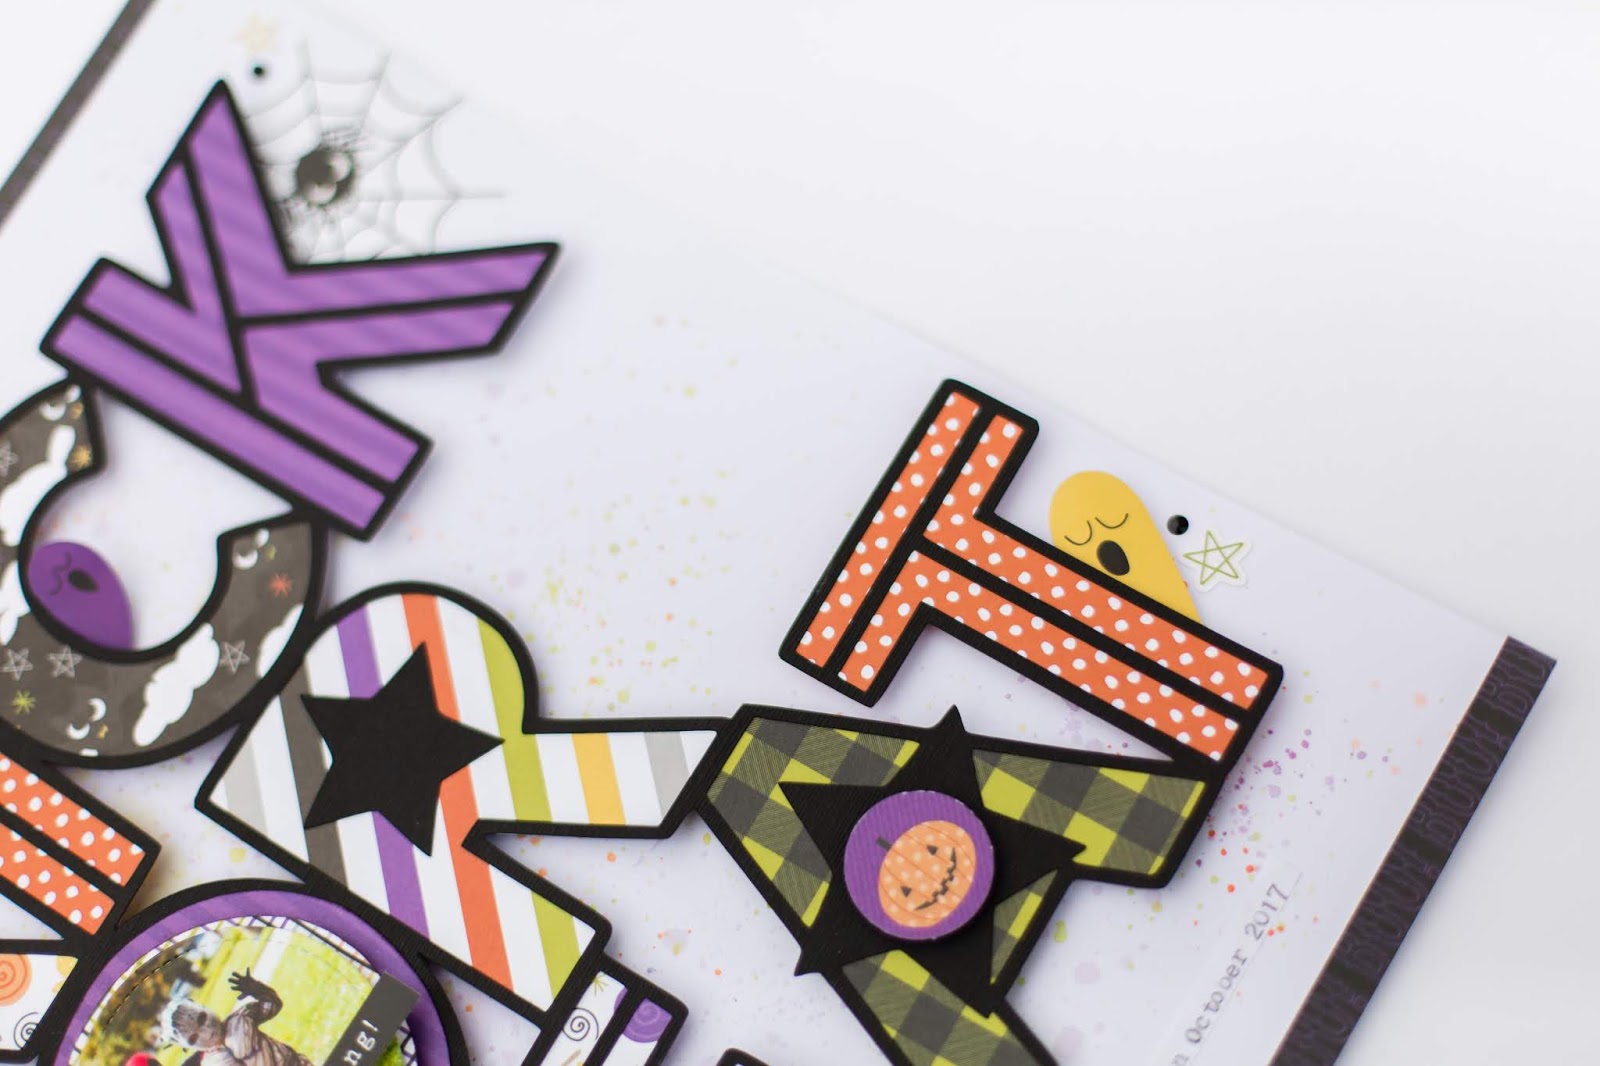
I also added some die cuts and other puffy stickers, using the stars in the cut file as home bases for the clusters. I had fun with this, using die cuts from several different Halloween collections, including Pebbles Midnight Haunting and Spooky Boo, Pink Paislee Spellcast, and puffy stickers from Pebbles Spooky Boo.


For a bit of journaling I used a 3x4 journal card that has been cut down and tucked underneath the cut file. Notice how all the embellishments lead your eye from the top to the bottom of the layout, following the words of the cut file!


My second layout idea was hatched as I took the negative parts of the cut file off my Silhouette cutting mat. It looked amazing, just having the words, and it also affords a bit of flexibility with the cut file. Here is how it looked once the positive space was taken away, and staged for the layout.


So I printed out a photo of our daughter Emberlynn, who that same year was dressed as Robinette of the Hood. Here is that layout, completed.


The background for this layout is too cool not to share. I added a layer of gesso to my patterned paper from Simple Stories Simply Fall. Then I used cheesecloth along with matte medium and gesso to adhere the cheesecloth to the background. This created a really rough, Halloween-themed texture that I absolutely adore! Once that layer was dry, I splattered Tim Holtz Distress Inks in Wild Honey and Seedless Preserves all around the page. This was so much fun!


Now the second round of fun can begin, with layering the negative space from the cut file and the photo + embellishments. Having the letters from the cut file now separated allowed me to drop them around the page, so I did just that. 


I adhered the letters using my hot glue gun so they would stay affixed to the background. I also added my photo, along with some fun embellishments from the Simple Stories Simply Fall collection. 


The one challenge I had in using the negative space was that some of the details of the stars were lost, so I decided to fill those stars. I have used some embellishments called Dew Drops that I had in my stash for so long I don't remember who made them. I laid them out into the shape of the star and poured Glossy Accents over them, and allowed them to dry overnight.


That was a fun adventure and I hope you've been inspired to try using the negative space of your cut files too! Thank you for joining me, see you soon!


Sunday, October 28, 2018

Fall Home Decor

Hey there! It's Devra  and I'm so excited to show you my project today! I made a DIY fall decor piece that I've been wanting to do for a while.


I used three different cut files. Fall Wreath and Finally Fall were cut with vinyl for the front of the glass block.  The wreath was easy. I made it small enough to fit on the block, then cut the vinyl.


Getting 'fall' cut was a bit tricky. I used the knife tool in the silhouette software to slice the 'feeling' off of 'feeling fallish'. Once that was done, I was able to cut just 'fall' to add to the center of the wreath.


Now on to the paper part! I cut several leaves from Leaf It to Me, backing them with patterned paper  to add color, pattern and yes, strength! I layered them on each side, on the top of the block. It looks so pretty siting on my table!


Surprise! I put twinkle lights inside the block! This is what it looks like all lit up. I love the lights through the cut files!


Thanks for taking a look at my project today! See you next time.


Saturday, October 27, 2018

Trick or Treat | Erica Thompson

Hey crafty friends!  Erica back with you to share another Halloween layout! Halloween has always been my favorite time of year! We love to deck out the house, watch scary movies and October 31st can never come soon enough! As soon as the kids get home from school on Halloween we get into costume and get things ready for the night! I love to take the kids out and get their photos taken with their costumes! I know one day they are going to love to look back and see what they dressed up for as kids!  Today I used the Trick or Treat cut file from The Cut Shoppe!  You can find it HERE!
I used the Photoplay Paper collection Trick or Treat!  I cut the file out with American Crafts black cardstock. I love how the colors pop against the black paper! The photos are from last Halloween when we had a superhero theme for our costumes! All 6 of the kids dressed up last year and it was kinda sad because I knew it would probably be the last time my oldest son Drake would dress. He was 18 last year and a good sport and dressed as the Joker! This file was so fun to back and pretty simple! I used a piece of smooth white American Crafts cardstock as my base. I wanted to add some splatters to the page just to add a little bit of some interest. I pulled out some stamp pads from Catherine Pooler that matched perfectly with the Trick or Treat collection. Grape Crush, Orange Twist and Lime Rickey! I love the Catherine Pooler inks so much. The colors are amazing and love how bright they stay when you let them dry on the page.
I decided I wanted to cut my photo out in a circle and place it in the letter O of the word Or.  I love how it turned out! 
I added foam tape to the back of the cut file to pop it up off the page.  I used the card stock stickers that come in the Trick or Treat collection pack to embellish around my layout.  I also used some black enamel dots to my layout! You can never go wrong with a few enamel dots on a project.
For my journaling I used my We R Memory Keepers typewriter to document who was under the awesome costumes and the year! Simple and to the point! I had so much fun with this cut file! If you are looking for some awesome Halloween cut files make sure to stop by The Cut Shoppe and pick some up! Also remember to check out the blog for more Fall and Halloween inspiration. 

Here is a look at my completed layout!

Thanks so much for stopping by today! I hope you all enjoy the rest of your weekend!


Friday, October 26, 2018

Finally fall | Sasha Biyanova

Hey, friends!!! Sasha here today with new bright layout about our fall! Every fall I use not only orange but also crimson shades. My daughter love this color :)


I've used Finally Fall cut file from The Cut Shoppe : the maple leaf and super cute title!


I've used watercolors on the background and only one strip of scrapbook paper with black dots. 


I've cut white title and pasted black cardstock behind letters. And also I've added hand-written journaling and embellishmebts.


Do you love fall? I think it's the most beautiful season, especially this year)))  And I want to scrap it more and more!!!


I've added short process video here. I hope you'll enjoy watching!!! 


Thank you for stopping by today!!! And I also hope you are feeling inspired and will visit The Cut Shoppe!!!

Happy crafting.