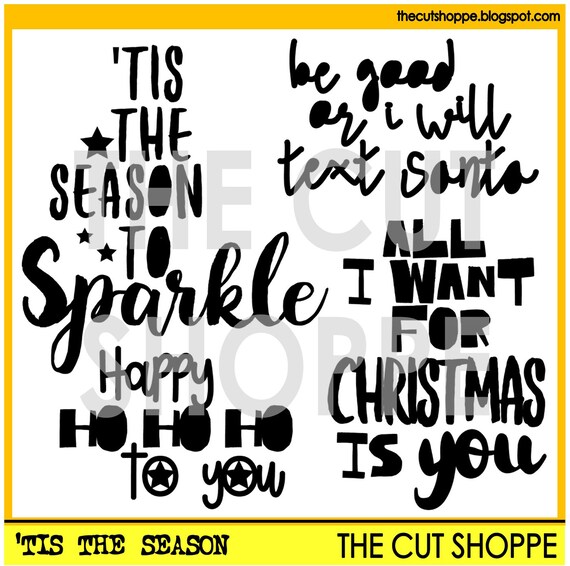
Showing posts with label 'Tis the Season. Show all posts

Friday, December 6, 2019

Joy - Kim Jeffress

Welcome to December and a brand new day. I love this time of year and I also love recording all the fun of the season in my December album. Today I am sharing my first day in my December album.


I have used the Tinsel Town set and the Bits and Baubles set, taking the Joy  and the tree from both sets and reducing in size to fit in the 3x4 pockets. I love how the look!


I love the white cardstock cut files against the gold glitter paper.


The joy I cut on some white cardstock and adhered it to the 3x4 piece of gold paper. I then added a punched red star and letter stickers over the top.


I trimmed the tree from the Bits and Baubles set in half, backed it with some gold glitter paper and laid it on the left of my 3x4 card.

I can't wait to create more in my December album.


Sunday, July 28, 2019

december daily traveler's notebook inserts | iris fox

Hello cut file enthusiasts!  Iris here, and I'm getting some more #scrappychristmasinjuly scrapbooking done thanks to several fabulous holiday files in the shop: Tis the SeasonChristmas MagicTree Farm, and Tinsel Town.


I made myself four custom December Daily inserts for use in my Color Cast Designs wood veneer Traveler's Notebook covers with binder rings.


I finally brought my WRMK Foil Quill out to play!  In order to use it, I opened the ‘Tis the Season cut file and used the Internal Offset function to thicken the lines.  In order to do that, I selected the top four words, clicked Internal Offset, chose 0.010 inches, and hit Apply.  That added a line just inside the original outline.  I did that once again so most of my letters were 3 lines thick.


I selected "Sparkle" and did the same thing, but this time I continued to click on the Internal Offset until it was filled in completely. Then I chose the Sketch function before pressing the Send button.  The heated Foil Quill tip traces all the concentric lines.


I traced the ‘Tis the Season with gold foil onto vellum, and one of the trees from Tree Farm in green foil onto another piece of vellum.  I cut each to 4.25”x8.25”, the standard Travler’s Notebook size, and for the gold insert, I used a Fiskars border scallop punch on the right edge.


After that experimentation, I decided to mix it up and switch to traditional cutting, using Felicity Jane papers that I pre-cut to TN size.  I cut the "be merry be bright" out of the buffalo plaid so the sentiment is the negative on the page. For "Ho Ho Ho", I first welded the three together, then cut.  I used the positive piece, adding two tabs made from the same paper with my Tiny Attacher, then I handstitched all around the outline.


Now I have four cool TN dividers for my December Daily!  If you're finishing up holiday projects from last year, or you've started thinking about prepping for this year, stop by The Cut Shoppe to snag some fun Christmas cut files and get creative!


Sunday, December 23, 2018

Tis The Season To Sparkle | Tarrah McLean

Merry Christmas Cut Shoppe friends!

It's Tarrah McLean back today to share a festive project with you! I wanted to create my own top to wear to work on my last day for the year and the Tis the Season cut file set was perfect for it!

image 0

Once I had traced the cut file, I wanted to see what the colours would look like in the software, so I filled the words and stars in to match with the green, red and gold glitter vinyl colours I had chosen. This is a great way to get an insight to how your finished product will look! See below a screenshot of the colours filled in.

You may notice that I moved the bigger star to the right hand side instead of the left where it was in the original design. I also moved the word 'season' so that it sat more in the centre. I released the compound path in the design software so that the words were separated and I could group and cut the same colours on the appropriate sheet of vinyl as you can see below. MAKE SURE YOU MIRROR YOUR DESIGN IN THE SOFTWARE for heat transfer vinyl as you have to load heat transfer vinyl upside down in the machine.

Once everything was cut, I weeded out the unwanted pieces of vinyl so that just the words and shapes that I wanted were left on the backing sheet. I laid them on to my shirt how I wanted the finished product to look being careful not to iron them onto themselves or onto backing sheet.

I then ironed them on using a hot setting on the iron with a thin tea towel in between the shirt and the iron. I checked if it had worked before I had finished by peeling up the corners of the backing sheet once it had cooled down a little bit.

Thank you so much for stopping by today! Merry Christmas and a Happy New Year to you and your family!


Tuesday, March 21, 2017

You Sparkle


Hello crafty friends!

Happy Spring everyone!  Today marks the beginning of a new season (hopefully the weather starts to change, too), soon everything will start to bloom, and with it comes a lot of color and cheerfulness.  With that in mind, I decided to celebrate the season with a new project using the beautiful Social Butterfly and 'Tis the Season cut files.


For this project, i wanted to use the beautiful butterfly image of the Social Butterfly cut file.  So i simply isolated just one of the images, and cut individual different size images on white card stock.   In addition, I used the outer edge of the image to cut the images  on papers from the Maggie Holmes' Chasing Dreams and some vellum.  


I glued the two pieces together just along the center line. Next I glued just the body part of the butterflies to the Bazzill Egg's Robin ombre card stock.  Using a paper piercer, i poked some holes, so that a bit of hand stitching can be added, ending on two french knots to form the butterflies's antennae.


The raised wings of the cut file bring so much dimension to the page, and creates a sense of movement to the layout.


To form the title,  I used the word "SPARKLE" from the 'Tis the Season cut file (as my niece is posing in front of the golden backdrop) to create a stitched title for this page.  A little bit of shimmer watercolor just complements the colors of the page.

I love how the colors, and the cut file work so beautiful to create a sense of dimension and movement on the page.  I hope this inspires you a bit today.  Remember to link any project that uses products from the store, and use the hashtag #TCSCUTITOUT to enter this month's challenge.

Til next time,

Keep on crafting!


Sunday, January 8, 2017

Happy HO HO HO to you..

Hello Hello! Michelle here today wishing you a Happy New Year! I hope you've had an enjoyable festive season, we certainly did here! Life is only just starting to get back to normal, so I thought it was perfect time to get some Christmas photos scrapped. The one I'm sharing today was taken Christmas morning amid all the chaos of paper and presents..


For this layout I've used some trees from the Tree Farm set, along with the title from the 'Tis the Season set from the many Christmas designs there are in store. I cut the designs out from white card to make to allow them to stand out on the page rather than blend into the mix of patterns and colour.

I've sewed the trees onto pattern papers from a Hip Kit, and the title was sewed straight to the background paper. This helped to adhere the title to the page without glue, but also because I love the textured look machine stitching gives to a page. 


Here's some close ups..

I layered die cuts, ephemera, a puffy sticker and flair button, from the same Hip Kit, with the trees to create an extremely large cluster. 

The photo stack was created using more pattern papers from the hip kit, along with a sticker and piece of frame


To the bottom right I grouped together another die cut piece, word strip, puffy stickers and some sequins, plus a flair button and glitter * to the right of the title


Lastly a mini cluster top left of the layout to balance it all out. I also added a strip of paper to the top and bottom of the layout, and a tonne of sparkly sequins 

Thanks so much for stopping by today! Be sure to check out whats NEW in store at The Cut Shoppe, and share with us what you create via Instagram!

Until Next Time, Happy Scrappin!


Friday, December 30, 2016

Tinsel Town Sparkle

Hey friends! Hope you all had a great Christmas!  Kelly here again to share another Christmas themed layout using The Tree Farm Cut File and The 'Tis the Season Cut File from The Cut Shoppe.


In Cricut Design Space I used the contour feature to make one of the Christmas trees from The Tree Farm Cut File into a solid image. I then sectioned the 'Tis the Season to Sparkle Cut File image to fit within the tree. I then used the slice feature within Design Space to cut the words from the tree image.


The cut file image is cut on white cardstock and I used multiple mixed media products to add color to the tree. I used a woodgrain paper for my background and a lot of fun paper and embellishments from the Pretty Little Studio-Tinsel Town Collection- designed by Ashley Horton for this festive layout.


I've also put together a process video that includes the Cricut Design Space tutorial on how I combined these cut file images....


....and just in case you missed it I also created a video tutorial showing you how to upload a cut file from The Cut Shoppe into Cricut Design Space.


Thanks so much for joining me today! Remember to head over to The Cut Shoppe to check out all of the amazing cut files and you still have today and tomorrow to take advantage of the sale that is happening now!


Sunday, December 11, 2016

'Tis The Season To Sparkle With Irit

Hi! Irit here and I'm excited to share with you a new holiday themed project I created using some lovely new cut files from the Cut Shoppe!
Here's my finished project-


These are the cut files I used:

'Tis The Season

Tree Farm


I love cutting my cut files using white cardstock because it allows me to choose any color scheme as I design my layout.


I used some lovely Felicity Jane kits papers and embellishments on this layout. I am all for using a non traditional color scheme for the holidays.


I resized the trees so I could have a variety of sizes. The smaller ones in the back, the bigger ones in the front with some foam adhesive to create depth.


Of course I welded some of the words in my title, it just makes it so much easier to handle!


I hope you feel inspired to go create something beautiful, make sure you check out these files and many more at the Cut Shoppe store! Have a lovely day!