Showing posts with label Cuppa Joe. Show all posts

Friday, May 25, 2018

Espresso Yourself ~ Cards In 2 Ways | Helen Gullett

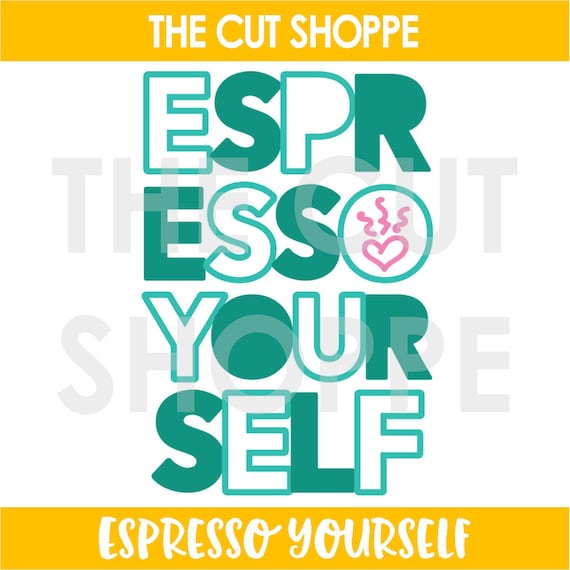
Hello everyone... Helen is here and today I have 2 cards that I created using the Espresso Yourself Cutting File, one of the new cutting files from The Cut Shoppe that just released last week.


On these cards, I am using both positive and negative cuts. This way, you can use to make 2 cards with just 1 cutting file. 

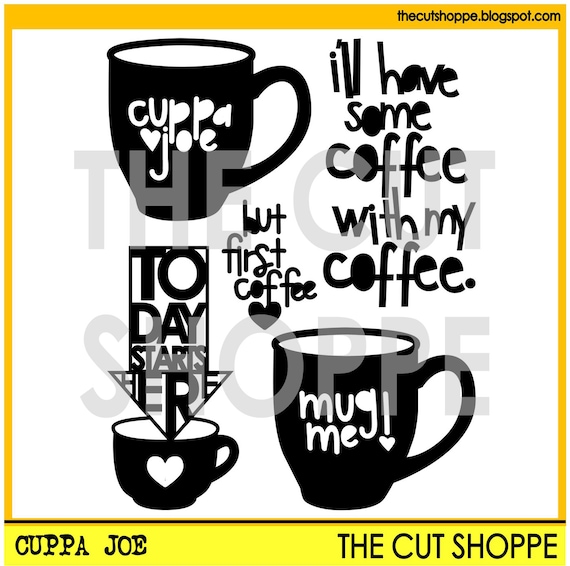
On my cut out, I modified the Espresso Yourself cutting file a little bit. Instead of the steamy heart image, I replaced it with one of the mugs from the Cuppa Joe cutting file


On this first card, I added the words on dark brown/white polkadots paper with dries-clear adhesive glue. After that I fussy cut the extra paper off the words.

I added some shadow on the words using Vintage Photo Distress Ink and foam applicator. After that I added on the card with 3D foam tape for extra dimension to them. I love how those words turned out, they look like chipboard words. On the background, I added a softer look patterned paper. 


On this second card, I added the cut out panel on a light brown/white polkadots patterned paper with dries clear adhesive glue and then I added the whole panel on a white card. 

Using digital cutting files, it quick and easy way to create handmade cards.


If you are coffee/tea/cocoa lovers, you are invited to join this fun Coffee Lovers Blog Hop and Link Up Party this week. You can link up any of your Coffee/Tea/Cocoa Spring and Summer theme projects until June 1. There are many prizes to win! Check out more details at Coffee Loving Cardmaking Blog.

Thank you so much for stopping by today. Hope you all have a fabulous caffeinated day!


Friday, November 10, 2017

Traveler's Notebook Cuppa Joe | Kelly Janes

Hey friends! Kelly back with you again today to share a new project using the Cuppa Joe Cut File in my Traveler's Notebook.


This is a first for me as I've never worked with a Traveler's Notebook. I'm participating in the My Thankful 30 project this year and thought a TN would be a great size to use for this project. I started my project in Cricut Design Space by slicing out a coffee cup image from the Cuppa Joe Cut File. I then used the Contour feature to hide all of the words within the coffee cup and mirrored the image so the handle would be on the opposite side.


I cut the coffee mug image on watercolor paper and used multiple products from Shimmerz Paints to paint the mug. I then used multiple Maggie Holmes products along with a few embellishments from my stash to complete this project.


I love that cut files can serve so many different purposes. They can be a focal image on your project, used as a die cut or as a layer like I've done here!


Now you can take a look at my process video that includes a Cricut Design Space tutorial.


Thanks so much for spending part of your day with me and remember to head to The Cut Shoppe Etsy Store to check out all of the cut files and digital collections!


Sunday, October 22, 2017

Mug Shot! | Elsie Robinson

Hey TCS fans, Elsie here with a new layout! I think you can all agree that Autumn seems to have become the season of flavoured coffee. Pumpkin Spice Lattes are everywhere, which is actually what inspired this this layout! Even though I really don't like Pumpkin Spice Lattes... Eek! I prefer the Christmas themed Lattes ;)

But anyway, here's my layout!


I firstly started by cutting out and backing one of the new cut files in the store 'The Great Pumpkin'. I cut it into three different sizes, the biggest pumpkin was about 6 inches wide. However, the paper was cut so thin that I definitely did not have the patience to carefully take the smaller pumpkins off the mat, so I ended up completely destroying them - oops!


Although this was easily fixed, as I used the offset tool in my Silhouette software to make the pumpkins a little wider. I made sure not to increase the width of the lines too much as I like the style of thinner lines. It worked perfectly the second time around!


I also used a leaf cut file from the 'Funky Florals' set for my pumpkin leaves because I wanted larger leaves on them to contrast with the bold orange and red patterns I backed the pumpkin cut files with.


I used the coffee mugs from the 'Cuppa Joe' set, and cut three of them out so I could scatter them amongst the pumpkins! I decided not to use either of the phrases on the cups and just cut the outlines instead.

I knew this would be a busy page and my title was going to be big element so I think to have those phrases on the cups as well, would've made the page a little too chaotic!


I love the title of this page, and it comes from 'The Java Script' set. I originally just cut the title from patterned paper but it wasn't standing out enough, so I offset the title and cut that shape from white card stock and matted the patterned piece onto that, which made it stand out a lot more!


Thanks for stopping by everyone! I'll see you soon for more layouts :)


Monday, October 17, 2016

Guest Designer | Kriszti Bozsits

Happy Monday everyone!  We've got a new Guest Designer to kick off some inspiration for this week.  Please help us welcome Kriszti Bozsits!

http://paperandpaperheart.blogspot.hu/
I'm a coffee addict. This page is created with my morning coffee. I used the Picture Perfect and The Cuppa Joe cut files (Cuppa Joe is one of my most favorite cut files I have ever laid eyes on). I decided to use My Mind's Eye On trend dots paper, Pink Paislee Fancy Free and Jen Hadfields collections for this layout. I machine stitched a circle around the design.


https://www.etsy.com/listing/234103375/the-picture-perfect-cut-file-consists-of?ga_search_query=picture+perfect&ref=shop_items_search_1

https://www.etsy.com/listing/254692343/the-cuppa-joe-cut-file-includes-5-coffee?ga_search_query=cuppa+joe&ref=shop_items_search_1

What a gorgeous layout Kriszti!!  Love the fun layering and the large stitched circle with the polka dot background paper!  Thanks so much for guesting with us!  You can find more of Kriszti's gorgeous work on her Blog, PaperHeart.
 
https://ashleyhortondesigns.blogspot.com/
 

Saturday, April 23, 2016

Guest Designer | Raquel Bowman

I am excited to introduce you to our second Guest Designer for the month of April, Raquel Bowman!  Raquel creates stunning layouts, that always catch my eye!  She is one of my fellow designers on the Pink Paislee and Hip Kit Club Design Teams, and I always look forward to seeing her work.  She definitely has a beautiful signature style, and I'm happy she's sharing it with us today!  Before we take a look at Raquel's layout, let's get to know a little bit more about her.

http://www.raquelbowman.com/

My name is Raquel and I am an Australian primary school teacher, Mummy to two kiddies (Jack 1 & Charlotte 3) and wife to Clint. I admit I am pretty obsessed with scrapbooking and love nothing more than playing with a variety of yummy papers and embellishments and making pretty stuff. I love spending time with my family, sharing coffee with friends, having creative time, a glass of wine at the end of a tough day and all things social media! I have been scrapping for around twelve years now and feel I have finally ‘found’ my style. I’m a lover of layers and clusters and enjoy adding little details while still maintaining white space, balance and a cleanliness to my layouts.

Here is Raquel's layout, and a little bit about her process for putting it together:

I used the Cuppa Joe set which anyone who knows me knows I love my coffee so it was a great chance to scrapbook about it again. I used the bright and fun Amy Tan Better Together collection to compliment the cut file. I enlarged the heart slightly so I could frame my photo within it, I was really happy with how it turned out. 


https://www.etsy.com/listing/254692343/the-cuppa-joe-cut-file-includes-5-coffee?ref=shop_home_listings

What a fun way to use the Cuppa Joe cut file!  And how cute is the photo placed in the heart shape on the coffee mug??!!  Love your creativity Raquel!  Thanks so much for sharing with us today.  You can find more of Raquel's work and follow her on Social Media by visiting the following links:

Periscope: raquelbowman
You Tube: https://www.youtube.com/user/raquelpSCRAP

Raquel will also be giving away the Cuppa Joe cut file!  So make sure you check out her social media for the change to win!!
http://www.ashleyhortondesigns.com/


Tuesday, December 29, 2015

Today Starts Here

Laura here with you today. My husband and I were able to go away for the first half of December to Costa Rica! It sure was nice to escape the cold and stormy Pacific Northwest. One of the places we visited was in the Los Santos region. It is called Los Santos because most of the towns are named for saint. We stayed near Santa Maria. Our first day we visited a coffee co-op processing plant that processes for all the local farmers. The area is full of valleys and mountains. You can go from 11,000 down to sea level in no time at all and all through the valley are coffee plantations. We learned all about the growing and processing of coffee there and it's an amazingly lengthy ordeal.

When I saw Cuppa Joe, I knew I would have to use those cuts for this portion of the trip. As a bonus, it's sort of Christmas colors with the red cherries. That is the first thing I learned, coffee starts as a cherry. The coffee bean we know and use is one half of the seed inside this cherry and it goes through an awful lot to get to your cup.


I started off by inking my craft mat with a red and two brown distress inks. I spritzed with water and pressed my watercolor paper into the ink. I love the watery/splattered look it left. Next I cut out a mat from the Retro Rectangles, which look like coffee beans to me. Next, I cut out 3 of the files from Cuppa Joe, from an espresso color, and inked up a bit to give some texture. A touch of red for the hearts and creamy coffee color makes them pop. I added my photos of the cherries on the tree and being brought in for processing, arranged my cuts and added a few embellishments from We Are Family and Hey Boy. Next came writing my stories onto journaling strips and scattering about the piece.

"Before your coffee ever hits your cup, it starts off as a cherry in a place like Costa Rica. We visited Coopedota in Santa Maria, CR and learned all about the process to get to your cup. First the cherries are picked and brought here where they are sorted, separated, dried, hulled, dried again, given rest, and either sold green or roasted and bagged in beans or grounds."

"Fun facts:
There are many layers to a cherry
The skin can't be eaten, but the insides are juicy and taste like honey
There are two bean halves (1 seed) per cherry
They use the hull (parchment) to fuel the furnaces
The plants require shade so other crop trees, like banana and avocado, are planted within. The limbs are trimmed to regulate shade"


I hope you learned something and think of all the work that goes into your next cup of coffee. I loved both of the cut file! Head over to the store and see how you can use them today.