Showing posts with label Color Shine. Show all posts

Saturday, January 7, 2017

Playground

Hello scrappy friends! It's Zinia here with another layout using one of the most recent cut files from the Cut Shoppe etsy store.

A couple of days ago Ashley released a bunch of new cut files among them was "The Half of It" background design.


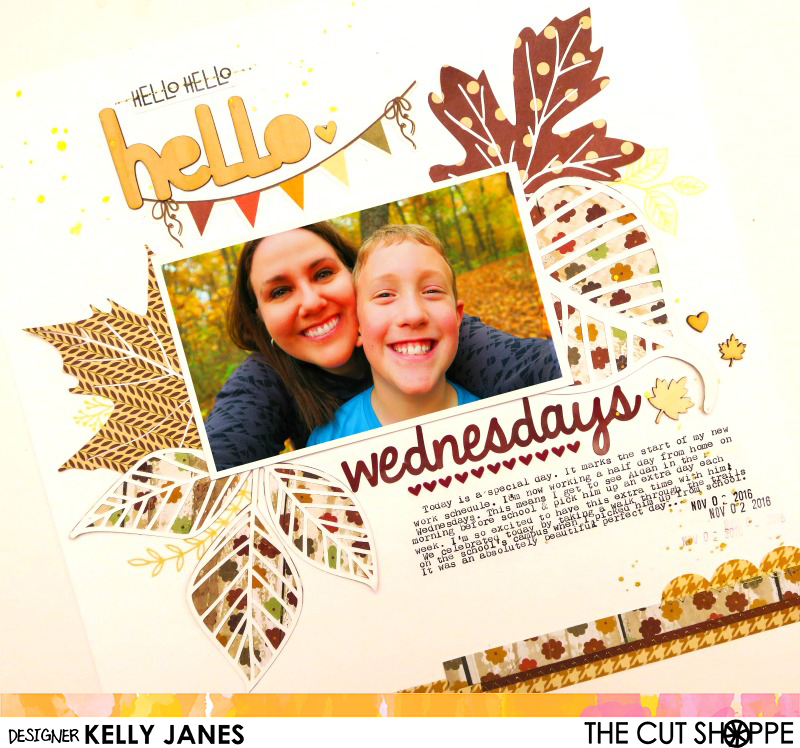
I started by editing the cut file in Silhouette Studio. I used the offset tool to create a border and turn the holes of the cut file into a "lace". I increased the size of the gap till most of the lines were touching so the cut file would stay all in one piece.


Once it was cut, I decided to try something different. I usually back my cut files with pattern paper and then use a piece of cardstock as my base. In this case, I chose a pattern paper to be my background and backed my cut file using colorful pieces of cardstock.


I stuck the cut file on my base using some foam dots and then I painted the open areas with white ink.


To embellish the page, I chose some bits from my December Hip Kits. I fussy cut some flowers and also picked a few words from the exclusive cut apart sheet and ephemera pack.


I also used a couple of products from the Paige Evans "Take me Away" collection as layers behind my photo and also to embellish.

It was a rather time consuming layout considering the time spent to back the cut file with cardstock but it was fun. I really hope I helped you get inspired to create something with your cut files. Until next time, happy scrapping :)

Tuesday, November 22, 2016

Hello Wednesdays!

Hey friends! Kelly here sharing a new fall layout using the Leaf It To Me Cut File from The Cut Shoppe!


Fall is my favorite time of year! The cooler weather, the leaves changing color and the awesome fall scrapbook goodies! I paired old with new for this layout using a couple Simple Stories collections that have been hanging around in my stash and then also using Ashley's fall collection, Oakley Avenue, from Pretty Little Studio.


I cut all four of the designs from the cut file. I love that two of the leaves are solid images and then the other two images are open allowing you to back the cut file with your favorite papers! Backing cut files is one of my favorite techniques!


I added the title to the top of the page using products from Oakley Avenue and paired those pieces with a banner from Simple Stories. I tucked the leaves behind my photo and then continued my title under the photo using alpha stickers from Simple Stories. I wanted to add a little more color between my typed journaling and the word 'Wednesday' so I grabbed a washi strip from the Oakley Avenue! The colors match PERFECTLY!


To finish the layout I added strips of paper from Simple Stories at the bottom of the page, gold machine stitching and splatters of Gold Color Shine.


Here's a process video showing how all of this came together!


Thank you so much for joining me today and don't forget to check out The Cut Shoppe!!


Wednesday, October 19, 2016

You Stole My Heart

Hello scrappy friends, it's Zinia here and today I want to share with you a wreath design I created using a super cute cut file from the Cut Shoppe etsy store.


So I grabbed a bunch of 6x6 paper sheets mainly from Paige Evans' "Take me Away" collection and I started cutting a some of the shapes from the Oodles of Doodles cut file.  I picked different shapes in different sizes for every paper I cut to have some variety of die cuts to work with.


Once I had all my pieces cut I arranged them on my page. To make my wreath more "rich" I decided to fussy cut some flowers that came in one of the 12x12 papers from the "Take me Away" collection. I started committing to the arrangement by sticking down the flowers first and then slowly adding the die cut pieces. 

It was a bit hard to balance all the different shapes, sizes and patterns but I took my time and made sure to spread everything evenly. 


To add some more interest around the wreath, I sprinkled with some Heidi Swapp Color Shine in Sweet Mint and Gold. 

For my title I used the gold phrase thickers from the "Take me Away" collection paired with the small gold alphas from the Maggie Holmes "Gather" accent stickers sheet.


With all the business of the wreath, I didn't really need to do a lot of embellishing. I added a few gold phrase stickers and a few more little bits just help the design look more balanced.


I'm really excited about the way this turned out. I enjoyed the whole process of placing all the little die cut pieces and adding the final touches with the extra embellishments.

I really hope you enjoyed this as well and you got inspired to create something beautiful with your cut files from the Cut Shoppe etsy store. Until next time, happy scrapping :)


Thursday, August 18, 2016

POW

Hello friends! Kelly here today with another layout and process video! Today's layout features the Hero Up Cut File in two ways!


I started by cutting the POW starburst on a scrap piece of paper and used it as a mask. With the mask in place, I sprayed my white cardstock with Gold Heidi Swapp Color Shine. Once the Color Shine was dry I added hand stitching and then cut the same starburst on a transparency. In the photo below you can really see the gold shine!


Next I added 2 small Instax photos. By printing the photos in a smaller format it helped hide the fact that they are dark, grainy, blurry phone photos. I added a cluster of embellishments that have been sitting in my stash for YEARS! Yay for using up product that has been collecting dust! There is a feeling of great accomplishment when that happens, right?! I also added messy stitching around the border of the layout for added texture and interest.


I've put together a video so you can see the process that also includes a Cricut Design Space Tutorial.


Don't forget to head to The Cut Shoppe Etsy Store to check out all the cut files that are available! Thanks for stopping by!


Sunday, July 24, 2016

Meet Cute

Happy Sunday! I hope you're all enjoying your weekend! Kelly here today and I have another layout plus a process video to share with you! I recently came across this photo of my son from 2010 and I absolutely loved his expression so I had to scrapbook it right away!


I started by pulling the Plus Infinity Background Cut File into Cricut Design Space and sliced out individual plus signs to create a random background on a piece of 12x12 patterned paper from the Simple Stories Sunshine & Happiness Collection. I backed the cut file with a patterned paper from Amy Tangerine's Stitched Collection. Before machine stitching those pieces onto the layout I added a little mixed media peeking out from behind the cut file to help bring out the yellow in the layers behind my photo.


I scattered a few of the plus signs that were left over from the Plus Infinity Cut File around the photo and added stitching through them for added texture. I also tossed in a flair button from my stash, a Heidi Swapp chipboard & acrylic piece, and odds & ends from American Crafts. No layout is complete without a little Heidi Swapp Color Shine splatter & enamel dots!


Here's a process video showing how all of this came together!! 


You can check out all of the amazing cut files by visiting The Cut Shoppe Etsy Store! Thanks for stopping by today!!


Thursday, June 30, 2016

Go Fly a Kite

When I was little, I always had so much fun flying kits with my grandpa...well, we probably spent more time getting them out of trees than actually flying, but it was still fun!  That's been a long time ago, but kites are still fun.  We grabbed some for the kids when we were at the beach earlier this year, and the new Go Fly a Kite cut file set was just what I needed to document the photos.


https://www.etsy.com/listing/449706072/the-go-fly-a-kit-cut-file-set-includes-7?ref=shop_home_active_3

I loved this set so much, I ended up using every image from it.  I cut all three kites in varying sizes and used a mix of patterned papers from the Life Is Beautiful collection from Fancy Pants.  And I couldn't have found a more perfect title for the layout, than Go Fly a Kite, so I cut it from one of the Fancy Pants patterned papers.


I wanted a little bit more color in the background of the layout, since I used a White cardstock base, so I sprinkled on three different Color Shine colors.  Then I cut the cloud designs from the Go Fly a Kite set and clustered them on the layout.  I finished the layout with a mix of embellishments from the Life Is Beautiful collection.  But I loved that most of the layout was created with nothing more than the cut files and patterned paper!


The Go Fly a Kite cut file set is now available in The Cut Shoppe Etsy store along with two other new designs!  Make sure you stop by the shop to check them out!!

https://www.etsy.com/shop/TheCutShoppe

http://www.ashleyhortondesigns.com/

Thursday, June 16, 2016

Soak Up the Sun

Hello again!  It's Ashley, stopping in today to share a layout with you using one of the new Cut File sets now available in The Cut Shoppe Etsy store!  I recently purchased the Life Is Beautiful collection from Fancy Pants, and I couldn't wait to use it with the Fresh Squeezed background cut file.  The 6x6 Paper Pad was perfect for backing the open spaces of the cut file.


https://www.etsy.com/listing/386734498/the-fresh-squeezed-background-cut-file?ref=shop_home_active_3


The Fresh Squeezed cut file just screams summer.  I wanted to use one of our recent beach photos and cut it in a circle shape, to mimic the cut file.  Then I grabbed a lot of the circle embellishments from the Life Is Beautiful collection to place in the center of some of the "lemon slice" shapes.  I also added in a few embellishments from Freckled Fawn that I picked up during one of their recent sales!


The letter stickers for the title are from the Fancy Pants Attwell collection.  I love that the two collections can be mixed together and that the letters coordinated with our daughter's swimsuit.  After adding the title, I decided to splatter a bit of Black Color Shine over the layout.  I wanted some contrast to go with the bright colors, from the Life Is Beautiful collection.  


You can pick up the Fresh Squeezed background cut file in the Shop!  It's available in 8.5x11 and 12x12 sizes.  While you're there, make sure you take a look at the other designs that are available today!

https://www.etsy.com/shop/TheCutShoppe


http://www.ashleyhortondesigns.com/

Monday, April 25, 2016

I Love You, Teddy

Hello there! I'm excited to be sharing a layout with you today using the new Open Letter Alpha cut file!


While there are many ways to use this cut file, I chose to use it as a large part of my title. 


I welded the word "Teddy", then cut it out and backed it with patterned paper. I anchored it on the middle of the page, and built my layout around it by adding my photo and the rest of my title.  If the focal point of your layout is something other than a picture, I find it's easiest to start with that, and then add the photos and other elements. This provides flexibility to resize/print photos if needed!


I used mist to paint the "XOXO" wood veneer black so it coordinated with the page.


I have plans on using this cut file for a title that takes up the whole page, and to also use the letters on a smaller scale. There are so many possibilities! Thank you for joining me, have a great day!


Thursday, February 18, 2016

Boys Rule

Are you ready for some awesome new Cut File sets!  This week there are four new sets in The Cut Shoppe Etsy store.  I created a layout with the new Boys Rule set.  I needed a break from girly layouts!  This set is perfect for the boys in your life.  I used several of the images from this set on my page.


https://www.etsy.com/listing/268639039/the-boys-rule-cut-file-set-includes-11?ref=shop_home_active_4

I started my layout by enlarging the Boys Rule image.  I wanted it as the title, but also as a large element on the layout.  I backed each of the letters with patterned papers from the Cocoa Vanilla Studio Made of Awesome collection and then machine stitched around each letterI also cut the sketchy circle with the star center and the multi sized star shape.  I like to create my own die cut embellishments to mix in with pre-made embellishments.  I finished the layout, with some Black Velvet Color Shine and the date from the Studio Calico large date stamp.

You will find all of these new designs in The Cut Shoppe Etsy store today!  Stop by and check them all out!

https://www.etsy.com/shop/TheCutShoppe
   
http://www.ashleyhortondesigns.com/