Sunday, July 31, 2016

Today Is A Happy Day!

Hello everyone! I am super excited to be part of the new The Cut Shoppe and to be sharing my first blog post here on the blog! I love Ashley's cut files and feel always so inspired when I see them! For today's layout, I used the "Feel The Love" cut file, but only used the circle with the "I love you this much" text.


In this case the text refers to a city rather than to a person and of course that's New York! My daughter is a huge New York fan and so the text is very appropriate.


When I finished cutting the circle with my Silhouette Cameo I made sure I kept the leftover "pie" parts apart. I wanted to use these later-on to place on my patterned paper as a template, so I could hand cut around them knowing I had the right size to fill my cut file. I used the "Stitched" collection from Amy Tangerine for my page. 


And that's it! Hope you like it! Thank you so much for stopping by to take a peek at my project! Wishing you a wonderful day! 


Saturday, July 30, 2016

Embrace Life Today

Does anyone else feel like the days are just flying by?  Sometimes life gets so busy that we forget to enjoy today because we are so busy preparing for tomorrow.  Wendy here today sharing a layout I created using the Go Fly a Kite cut file and Land Ho cut files. 


I paired my cuts with the Fancy Free collection from Pink Paislee to add the watery feel I was looking for along with a splash of color.  The darker blues in the collection were perfect for the waves and more stormy feel of the big bold chipboard title.


I love cutting things from white cardstock as I can pull the extras for any project I might be working on.  Sometimes though, white can be a little plain, but with a little penwork it can become an eye catching piece.


Thanks for joining me today!  If you have been inspired to play with these cut files you can find them in the Cut Shoppe Etsy store.  


Friday, July 29, 2016

Sweet.

Hello there, friends! Enza here today to share a new layout featuring one of my favorite cut files ever. It is called Spinwheels. I love how versatile and fun the design is!


This is a picture of my little one. She is two and, for sure, full of personality. My idea was to create a soft and dreamy, yet colorful page. The cut file, as well as the patterned papers I picked, made it easy to achieve the look I had in mind. I found this Heidi Swapp paper pad at my local Michaels in the Marquee letter section of the store. I knew that was meant to decorate the letters, but it was too beautiful to pass up. It is very thin paper, so hard to use on its own, but perfect to back up cut files.

I opened the cut file in my Cameo and removed some of the pinwheels from the center, in order to create a diagonal design. Then, I isolated one of the shapes and outlined it with the offset option. I duplicated it several times, modifying the size. I wanted to give some movement and different textures to the layout. That is also why I used foam dots under the pinwheels and stitched around them.


Some mixed media, fussy cut flowers, and rub-ons from the Amy Tangerine Better together collection finished the layout.


I hope you felt inspired and will give the Spinwheels cut file a try. This and a lot more fun designs can be found in The Cut Shoppe Etsy store.

Thank you for stopping by.

Have a great day!


Thursday, July 28, 2016

Go See Do at the Zoo

It's Thursday and we've got some great new cut file designs available this week in The Cut Shoppe Etsy store!  I decided to try out the Hul-La-Ba-Zoo cut file this week and use it to create a background look for my layout.


https://www.etsy.com/listing/468665995/the-hul-la-ba-zoo-cut-file-set-includes?ref=shop_home_active_3

I cut each animal from the set from White cardstock.  Then I cut a second solid shape to layer behind the cut file, from Bella Blvd. patterned papers.  I placed some of the animal shapes going off of the White cardstock background, to give it a patterned paper look.  


I used the rest of the White space on the layout for embellishments.  I added several stickers from the Bella Blvd. Zoo Crew collection along with a mix of Flair Buttons from A Flair for Buttons.  I also machine stitched each of the stickers to add some texture to the layout.


There are so many fun ways to use the Hul-La-Ba-Zoo cut file set, so make sure you stop by TCS Etsy store to pick it up!  And while you're there, check out the other new cut file sets that are now available.

https://www.etsy.com/shop/TheCutShoppe

http://www.ashleyhortondesigns.com/
 

Wednesday, July 27, 2016

Be Happy

Hello everyone! It's Zinia here again to share with you another layout I created using one of my most favorite The Cut Shoppe cut files ever.

The cut file I used here is Rosey Posey and it's one of the most beautiful floral cut files I've ever seen.  You can probably tell that I really love florals.


So I cut this file out of an A4 piece of paper (similar to 8,5x11) without having a specific plan. I played around a bit with some supplies of my stash and I decided I wanted to use a dark floral paper by the Simple Stories Carpe Diem collection.


I layered a piece of vellum with gold words on top of the paper to lighten it a bit and then I thought that I should bring in some more of that gold. That's how  I decided to mist my cut file with a gold Glimmer Mist. I didn't want to cover it completely, just add some glimmer to it and create a messy gold pattern.


I layered my photo on some yellow polka dot paper and some tissue paper and embellished around it with some random bits from my stash. I used a flower I fussy cut out from another paper of the Carpe Diem collection, a Pink Fresh Studio rubber charm, a Dear Lizzy brad and some white thread.


As a finishing touch I added some strips of the Tim Holtz tiny phrase stickers.


I really hope you got inspired to create some beautiful projects with some amazing design from The Cut Shoppe. Thanks for stopping by.


Tuesday, July 26, 2016

Take a Hike!

Hi there! Jennifer here today to share a layout using a new cut file from The Cut Shoppe Etsy Store called Nature Lover.

For this layout I used Pink Paislee's Outfitters Collection with a photo of my daughter on a hike with some friends. What I love most about this paper is that Yakima, Washington, is included and that is where the photo was taken!


I began this layout with the Going My Way cut file as the anchor on my patterned paper. 


The title and arrows were next, but I chose to do something a little differently here and that was to add gold foiling. Recently, I received a Minc for my birthday and I have been putting foil on everything! The foil will adhere to the toner in laser printers, which allows me to foil prints. I also found a toner pen that allows me to write and then send my doodles through the machine to add the foil. Genious!


After cutting, and before removing them from the mat, I used the toner pen on the arrows and title.
 

 The result was awesome!


I finished the layout by adding embellishments and journaling.

      
Thank you for stopping by today and happy creating!

Monday, July 25, 2016

You are Rad

Hi friends!

It's Mandy here today and I have a layout to share with you that features a photo of my nearly 9 year old son. He recently purchased a new skateboard and a hat with his pocket money that he had saved up. Usually he's not that keen for me to take photos of him, but he was super happy with his new purchases, so he was willing to let me to take some photos of him showing off his new gear! Yay for me, because I got some great photos of him to scrap!


I used the 
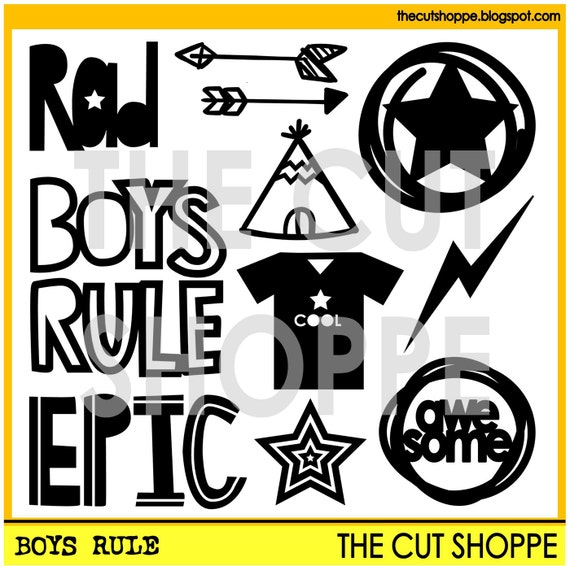
Boys Rule cut file set, which had the perfect words and accents for this page!

The Boys Rule cut file set includes 11 boy themed icons, that can be used on your scrapbooking and papercrafting projects.

I don't know about you, but I find boy layouts just a little bit harder than girly ones. I think I just gravitate towards all the pretty things! But using these cut files teamed up with the Totally Rad collection from Cocoa Vanilla Studio, made creating this boy layout super easy, and I'm really happy with the end result! I love all of the files in this set, and I can see myself using it a lot for my boy layouts!

Here are a couple of closeups of my layout...


I cut the word 'Rad' from one of the patterned papers to use as part of my title, and I added some foam tape behind it to give it extra dimension. I also used the Boys Rule cut file set to cut an arrow and some stars to embellish my page. These co-ordinated perfectly with the die-cuts and stickers that I used from the Totally Rad collection! I arranged the embellishments diagonally on the layout to help the viewer's eye to travel down the page, and to keep the focus on the photo.


This cluster on the top left hand corner of my photo includes another star that I cut using the Boys Rule cut file set, as well as a flair button from D-lish Scraps, and more Cocoa Vanilla embellishments.

To finish the layout off I added my journalling as well as a few enamel dots and black ink splatters.

Thanks so much for joining me today! Keep your eye out for some awesome new cut files that will be in the shop later this week!

Until next month, happy scrapping!

Sunday, July 24, 2016

Meet Cute

Happy Sunday! I hope you're all enjoying your weekend! Kelly here today and I have another layout plus a process video to share with you! I recently came across this photo of my son from 2010 and I absolutely loved his expression so I had to scrapbook it right away!


I started by pulling the Plus Infinity Background Cut File into Cricut Design Space and sliced out individual plus signs to create a random background on a piece of 12x12 patterned paper from the Simple Stories Sunshine & Happiness Collection. I backed the cut file with a patterned paper from Amy Tangerine's Stitched Collection. Before machine stitching those pieces onto the layout I added a little mixed media peeking out from behind the cut file to help bring out the yellow in the layers behind my photo.


I scattered a few of the plus signs that were left over from the Plus Infinity Cut File around the photo and added stitching through them for added texture. I also tossed in a flair button from my stash, a Heidi Swapp chipboard & acrylic piece, and odds & ends from American Crafts. No layout is complete without a little Heidi Swapp Color Shine splatter & enamel dots!


Here's a process video showing how all of this came together!! 


You can check out all of the amazing cut files by visiting The Cut Shoppe Etsy Store! Thanks for stopping by today!!


Saturday, July 23, 2016

Hello Hearts

Hello friends Candace here with you to share a layout using the new Hello Hearts cut file.  I am in love with this cut file!  A am a sucker for a cute cluster of hearts any day!  Here is a look at the cute hearts!


I stepped out of my normal and used a patterned paper background to allow the white cut file to stand out more.  I backed the cut file with a subtle patterned paper to not distract from the black and white photo.  Here is a look at the final layout!


A few close ups...


Thanks for stopping by today!  You can check out the Hello Hearts cut file in the shop here.  Have a beautiful day!
Candace